About
This PEBakery / WinBuilder project can be used to download and install a subset of the Windows Assessment and Deployment Kit (ADK) and used for a limited range of Assessment and Deployment Kit (ADK) tasks - namely building a Windows Preinstallation Environment with optional components. The following versions of the ADK are supported -
- ADK for Windows 8
- ADK for Windows 8.1
- ADK for Windows 10.0.10240
- ADK for Windows 10.0.10586
- ADK for Windows 10.0.14393
- ADK for Windows 10.0.15063
- ADK for Windows 10.0.16299
Please note that when running the project, simple file paths without spaces are recommended and should be used if possible. E.g. extract the files in the project download to C:\ADK\.
Index
Assessment and Deployment Kit(s)
The Assessment and Deployment Kit was first introduced with Windows 8. Previous versions of Windows from Windows Vista to Windows 7 had similar functions to the ADK available in the Windows Automated Installation Kit (WAIK). There are a number of different ADK releases. Whilst each release is operating system specific, there is some backwards compatibility - the ADK for Windows 10.0.16299 for example can be installed on pre Windows 10.0.16299 Host Operating Systems. Current ADK releases include -
- ADK for Windows 8
- ADK for Windows 8.1
- ADK for Windows 10.0.10240
- ADK for Windows 10.0.10586
- ADK for Windows 10.0.14393
- ADK for Windows 10.0.15063
- ADK for Windows 10.0.16299
More detailed information about some of the Windows Assessment and Deployment Kits listed above is available here.
The ADK contains a range of tools that can be used for deployment purposes. This ADK project however focuces on the Windows Preinstallation Environment aspect of the ADK, which cuts down on the number of files that need to be downloaded and installed on the host operating system.
The standard method for downloading and installing the ADK is to download and then run the executable - adksetup.exe. Please note that each ADK version has its own build specific adksetup.exe. Whilst command-line switches can be used to install individual components, running adksetup.exe will download the full ADK - including unrequired components and features. The current adksetup.exe for Windows 10.0.16299 (Build 1709) lists the following features -
- OptionId.ApplicationCompatibilityToolkit
- OptionId.DeploymentTools
- OptionId.WindowsPreinstallationEnvironment
- OptionId.ImagingAndConfigurationDesigner
- OptionId.ICDConfigurationDesigner
- OptionId.UserStateMigrationTool
- OptionId.VolumeActivationManagementTool
- OptionId.WindowsPerformanceToolkit
- OptionId.WindowsAssessmentToolkit
- OptionId.MediaeXperienceAnalyzer
- OptionId.UEVTools
- OptionId.AppmanSequencer
- OptionId.AppmanAutoSequencer
This project will only download and install the components required for the following -
- OptionId.DeploymentTools
- OptionId.WindowsPreinstallationEnvironment
Installing multiple ADK versions on the same system is not advisable and may cause issues. It is also of note that only one Windows 10 ADK version should be installed at any given time, as the registry keys added during the installation process will overwrite at least some of the settings from any previous version already installed. As these particular registry keys are used for verification checks in this ADK project please do not attempt to install more than one Windows 10 based ADK.
ADK Optional Components
For more detailed information about Optional Components (aka Packages), refer to WinPE: Add packages (Optional Components Reference)
In essense, the Optional Components extend the functionality of a basic Windows Preinstallation Environment by adding additional features not supported in the basic build. Some of the Optional Components include -
- WinPE-HTA - WinPE-HTA provides HTML Application (HTA) support to create GUI applications through the Windows Internet Explorer script engine and HTML services....
- WinPE-WMI - WinPE-WMI contains a subset of the Windows Management Instrumentation (WMI) providers that enable minimal system diagnostics....
- WinPE-NetFX - WinPE-NetFX contains a subset of the .NET Framework 4.5 that is designed for client applications.
Not all Windows binaries are present in Windows PE, and therefore not all Windows APIs are present or usable. Due to the limited API set, the following .NET Framework features have no or reduced functionality in Windows PE....
Some of the Optional Components have dependencies. If installing the WinPE-NetFx package for example, the WinPE-WMI package must be installed first. These dependencies are handled automatically in the ADK project.
PEBakery Basics
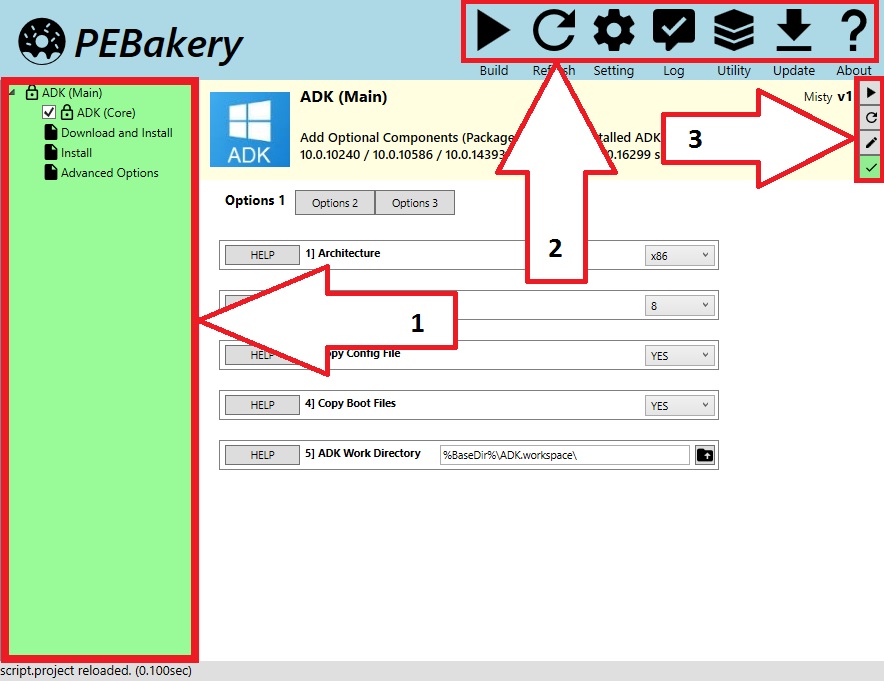
The PEBakery Interface is divided into several sections -
- Expandable folder tree with a list of project scripts in the left panel.
- PEBakery settings/options buttons in the top panel. Buttons from left to right -
- Build - run the project.
- Refresh - Refresh all scripts in the PEBakery cache. Any edits to scripts made since PEBakery was started, or scripts added to the project, will take effect. If a script is added to the project directory for example, it will not be displayed in the folder tree until the Refresh button is pressed.
- Setting - PEBakery build engine settings with numerous options.
- Log - display log files.
- Utility - can be used to check/generate code for writing scripts.
- Update - not yet implemented.
- About - contains information about the build version and software licence(s).
- Script settings/options buttons to the right of the script titlebar. From top to bottom -
- Run Plugin - run the selected plugin without running the full project. Useful for pre/post processing scripts.
- Refresh Plugin - refresh the selected scripts in the PEBakery cache. E.g. if the script file has been edited since PEBakery was started.
- Edit Plugin - open the selected script in a text editor (or other default program associated with .script files).
- Syntax Check - useful for developers to check the code for syntax errors. If default PEBakery settings are used then this button will be displayed in green if there are no errors in the script, or orange if there are any syntax errors.
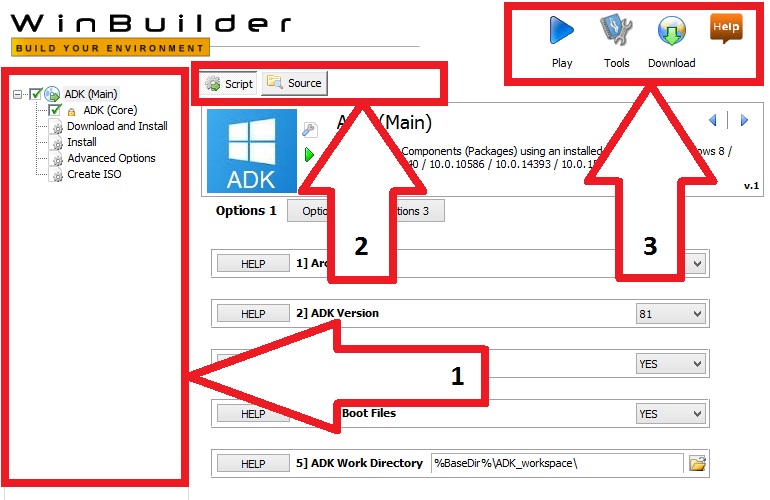
WinBuilder Basics
The WinBuilder Interface is divided into several sections -
- Expandable folder tree with a list of project scripts in the left panel.
- Toggle between Script / Source / Log view(s) using the buttons in the top middle row.
- Script - display the script interface.
- Source - set path(s) for source and target files. Please note that this option is not used in the ADK project.
- Log - view a log from the most recent operation. Also includes an option to export the log as a .html file. Please note that this button will not be visable until after the project has been run.
- WinBuilder settings/options buttons in the top right panel. Buttons from left to right -
- Play - run the project.
- Refresh - Refresh all scripts. If a script is added to the project directory for example, it will not be displayed in the folder tree until the Refresh button is pressed.
- Tools - WinBuilder build engine settings with numerous options. The WinBuilder license is also available here.
- Download - not used in the ADK project.
- Help - clicking on this button will open the WinBuilder wiki in your default web browser.
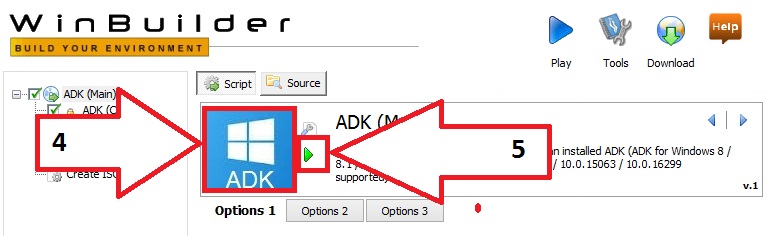
- Icon - The icon/graphic for the script is a hidden button that can be used to open the source editor.
- Play - script play button. This is used to run the selected project script only - not the full project.
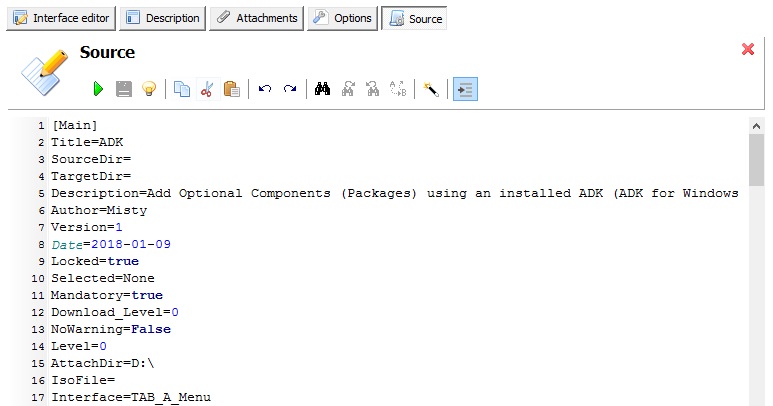
The following screenshot shows the built in source editor (display by pressing the icon/graphic button (see above))
ADK (Main)
Use this project script to configure build options before starting the build process. See also the ADK (Core) script, which is used to select Optional Components to include in the build.
A number of configuration options are set in the main project script, which has two seperate interfaces - toggle between them by pressing on the tab style Options 1, Options 2 and Options 3 buttons -
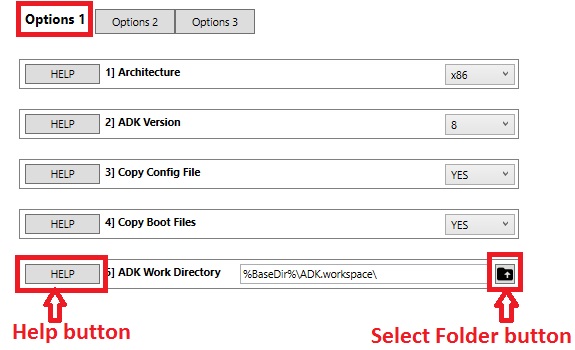
Options configurable in the Options 1 interface/tab (see screenshot above) -
- 1] Architecture - select the required WinPE processor architecture. Select x86 to build a 32-bit WinPE or amd64 to create a 64-bit WinPE build.
- 2] ADK Version - use this option to select the ADK version installed on the Host Operating System. Select 8 if the ADK for Windows 8 is installed. Select 81 if the ADK for Windows 8.1 is installed. Select 10 if any of the Windows 10 based ADKs are installed.
- 3] Copy Config File - during the project run, any Optional Components added to the WinPE will be listed in a configuration file (WinPE.Packages.ini). Select YES to this option to copy the configuration file to the WinPE root folder so that it's available in the running WinPE.
- 4] Copy Boot Files - select YES to this option to copy boot files to the mounted/extracted WinPE. This option is useful if the WinPE is used in the MistyPE or Mini-WinFE projects.
- 5] ADK Work Directory - use this to select the directory path for the build files and WinPE file. The path must end in a backslash - this is added automatically if the Select Folder button is used to set the path. Please specify a new/empty directory as this directory (and sub directories) will be deleted during the build process if is already exists.
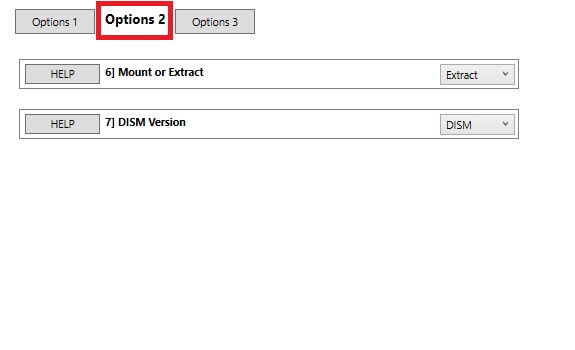
Options configurable in the Options 2 interface/tab (see screenshot above) -
- 6] Mount or Extract -
Select Mount to mount the source .wim file using DISM or TinyDISM. Select Extract to apply the full contents of the source file to the ADK work directory. Extract will take longer, but is less prone to errors that might occur during unmount operations if the Mount option is used.
- 7] DISM Version - Select DISM to use the Microsoft DISM.exe included in the ADK version selected in option 2] ADK Version. Select TinyDISM to use the experimental command-line version of reboot.pro forum member erwan.l's TinyDISM.
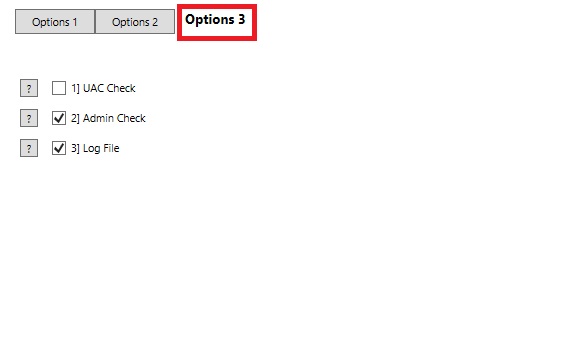
Options configurable in the Options 3 interface/tab (see screenshot above) -
- UAC Check - Check if User Account Control (UAC) is enabled and display a warning message if it is. The user will have the option of ignoring the warning and continuing with the build process.
- Admin Check - Check if the user is running with Administrator Privileges and abort if not. The build will not work without Admin Privileges due to some of processes that need to be executed - including mounting registry hives.
- Log File - Automatically save a log file with a name dynamically based on date and time. This action will be executed on successful completion of the build
To run the build process -
- Configure the options in the ADK (Main) project script.
- Ensure that the required ADK (set in option 2] ADK Version in the ADK (Main) project script) has been installed on the Host Operating System.
- Select any required Optional Components (in the ADK (Core) script).
- Click on the Build button (PEBakery) or the Play button (WinBuilder) -


ADK (Core)
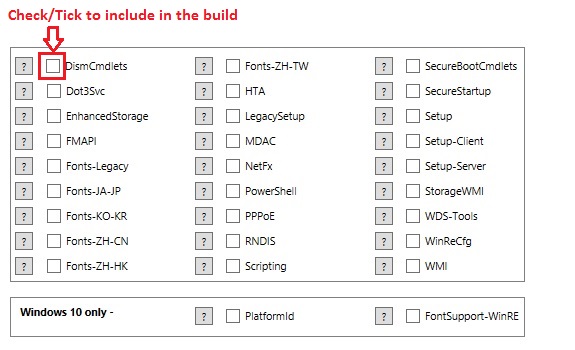
Use this script to add any required Optional Components to the build. See also the ADK (Main) project script, which is used to select configuration options.
All package dependencies will be added automatically. Simply ensure that the box to the left of any required Optional Component is ticked to include it in the build -
To run the build process -
- Configure the options in the ADK (Main) project script.
- Ensure that the required ADK (set in option 2] ADK Version in the ADK (Main) project script) has been installed on the Host Operating System.
- Select any required Optional Components (in the ADK (Core) script).
- Click on the Build button (PEBakery) or the Play button (WinBuilder) -
Download and Install
Unless an Assessment and Deployment Kit has already been installed on the Host Operating System then this is the recommended method of downloading and installing the required Assessment and Deployment Kit. If you have existing Assessment and Deployment Kit files (obtained for example by running adksetup.exe) but have not actually installed the ADK, then consider using the Install script.
The project will check for an existing ADK download if this script has previously been executed - the path checked will depend on the option selected in option 1] Download ADK Version in this script. All .cab file dependencies are checked for and an attempt to download any missing .cab dependencies will be made if they are required. The installers will not be run if there are any missing dependencies.
Script options -
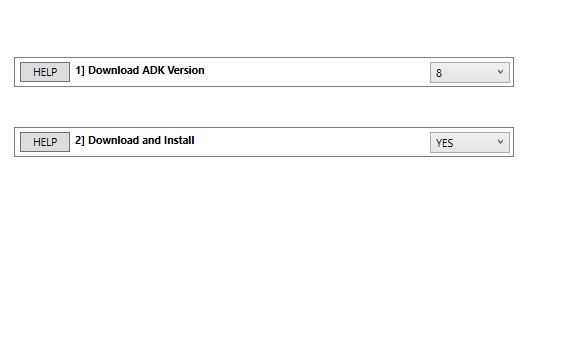
- 1] Download ADK Version - Select 8 to download and install the ADK for Windows 8. Select 8.1 to download and install the ADK for Windows 8.1. Select 10.0.10240 to download and install the ADK for Windows 10.0.10240. Etc.
- 2] Download and install - Select NO to download the ADK version selected in option 1] Download ADK Version without running the .msi installers. Select YES to download and install the selected ADK.
PEBakery - Click on the Run Plugin button to execute this script -

WinBuilder - Click on the script Play button to execute this script -

Install
Use this project script to run the following installers -
- Windows Deployment Tools-x86_en-us.msi
- Windows PE x86 x64 wims-x86_en-us.msi
- Windows PE x86 x64-x86_en-us.msi
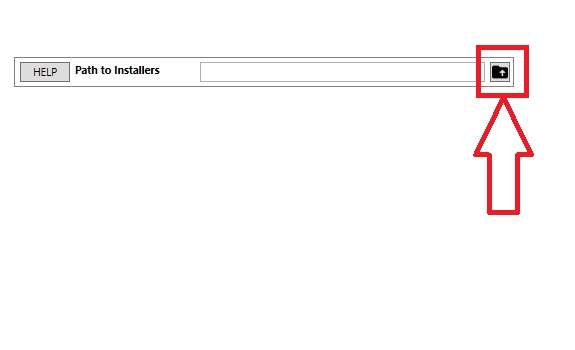
The folder path to the installers should be entered in the dialog box embedded in the script. The path must end in a backslash - this is added automatically if the Select Folder button is used to set the path.
PEBakery - After adding the path to the .msi installers, click on the Run Plugin button to complete the installation -
WinBuilder - After adding the path to the .msi installers, click on the script Play button to complete the installation -
Please note the the source files will not be checked for .cab file dependencies if this project script is used to install the ADK.
Advanced Options
A number of post processing options can be carried out using this script. For more information about individual option, please click on the help button(s).

Delete Folder
If Extract is selected in option 6] Mount or Extract (in the ADK (Main) script) then there may be issues with deleting the ADK work directory after a project run. This issue results from DISM changing/applying security permissions/ownership of files that effectively become locked and cannot be deleted by the current user. The Delete Folder script can be used to delete a selected folder. It will first attempt to run a DirDelete command, if this fails then takeown.exe and icacls.exe will be executed to change ownership and permissions of all files and subfolders in the selected directory before a second attempt to delete it is made.
The following commands are executed -
- takeown.exe /f "Path_To_My_Directory" /r /d y
- icacls.exe "Path_To_My_Directory" /grant administrators:F /t
Select the target directory that you want to delete using the FileBox. Please note that if manually entering a path it must end in a backslash (\).

To delete the selected directory, click on the Delete button -

Warning - all files in the selected directory (and sub-directories) will be deleted. Use with caution.
Note - If Mount is selected in option 6] Mount or Extract (in the ADK (Main) script) then a failed unmount command may also cause issues with deleting the ADK work directory. Consider trying the Unmount or Unmount/Discard option(s) in the Advanced Options script.
Create ISO
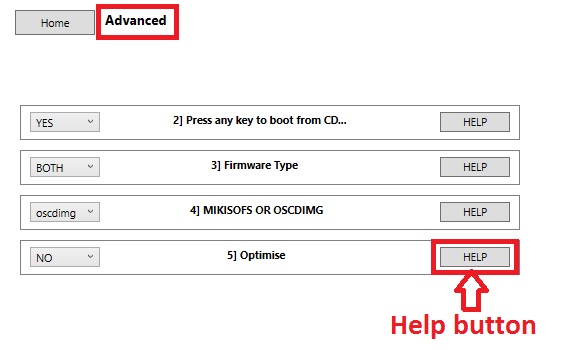
A number of settings can be changed in this script. For more information about individual option, please select the Advanced tab and click on the help button(s) -
This is a post processing script. Running it will create a bootable .iso file in the project root directory.
PEBakery - Click on the Run Plugin button to execute this script -
WinBuilder - Click on the script Play button to execute this script -
Build Process/Checks
In this project Beta release, some file verification checks are carried out. These will be impoved in future releases.
When a build is started, the ADK version selected in option 2] ADK Version (in the ADK (Main) project script) is used to identify which registry key to check. The registry keys are covered in more detail in the Registry Key Checks section. The selected key will be checked and if it exists the path to the ADK files will be read from the key.
The ADK folder path obtained from the registry in the preceding step is then used to check for the existence of several key files/directories. If these are missing then the build will be aborted.
The ADK work directory defined in the project (in option 5] ADK Work Directory in the ADK (Main) project script) is checked and will be deleted if it exists. You will be prompted to check whether to proceed.
winpe.wim is copied from the Assessment and Deployment Kit installation to the ADK work directory defined in the project (in option 5] ADK Work Directory in the ADK (Main) project script). If the path to the work directory is set as C:\ADK\ADK.workspace\, then it will be copied to the following path -
- C:\ADK\ADK.workspace\ISO_Root\sources\boot.wim
If Extract is selected (in option 6] Mount of Extract in the ADK (Main) project script) then wimlib-imagex is used to extract all files from the winpe.wim copied in the preceding step to the directory set in option 5] ADK Work Directory (in the ADK (Main) project script). E.g.
- Extract files from - C:\ADK\ADK.workspace\ISO_Root\sources\boot.wim
- To - C:\ADK\ADK.workspace\mount
If Mount is selected (in option 6] Mount of Extract in the ADK (Main) project script) then either DISM or TinyDISM is used to mount the .wim copied previously to the directory set in option 5] ADK Work Directory (in the ADK (Main) project script). E.g. C:\ADK\ADK.workspace\mount
The DISM.exe version from the selected ADK (or TinyDISM) is used to apply any packages selected in the project (in the ADK (Core) script) to the ADK work directory - e.g. C:\ADK\ADK.workspace\mount\.
If Extract is selected (in option 6] Mount of Extract in the ADK (Main) project script) then wimlib-imagex is used to inject all files/settings added by DISM \ TinyDISM in the preceding step back into the source .wim file. E.g. C:\ADK\ADK.workspace\ISO_Root\sources\boot.wim.
If Mount is selected (in option 6] Mount of Extract in the ADK (Main) project script) then DISM \ TinyDISM will be used to Unmount the image - committing any changes made by DISM \ TinyDISM.
The wimlib-imagex "optimize" command is executed on the source .wim file.
Registry Key Checks
During the installation process a registry key with a REG_SZ type value will be added to the registry. The data in this entry contains the path to any installed Windows Assessment and Deployment Kits. The key and value will differ depending on the version of the ADK installed, and on whether the Host Operating System is 32-bit or 64-bit.
Key(s) and value for the ADK for Windows 8 -
- HKLM\SOFTWARE\Microsoft\Windows Kits\Installed Roots > KitsRoot
- HKLM\SOFTWARE\Wow6432Node\Microsoft\Windows Kits\Installed Roots > KitsRoot
Key(s) and value for the ADK for Windows 8.1 -
- HKLM\SOFTWARE\Microsoft\Windows Kits\Installed Roots > KitsRoot81
- HKLM\SOFTWARE\Wow6432Node\Microsoft\Windows Kits\Installed Roots > KitsRoot81
Key(s) and value for the ADK for Windows 10 (all builds) -
- HKLM\SOFTWARE\Microsoft\Windows Kits\Installed Roots > KitsRoot10
- HKLM\SOFTWARE\Wow6432Node\Microsoft\Windows Kits\Installed Roots > KitsRoot10
These keys will be checked when certain project scripts are executed. If for example the Download > Download and Install script is executed, checks will be made against the registry settings to see if the selected ADK is already installed. Similar checks are also made if the Install > Install script is executed. The
PEBakery Logs
PEBakery has built in logging support with a database store containing logs for previous builds. These logs are very useful for troubleshooting problems with both the project and PEBakery. Logs can be accessed via the Log button in the top row of buttons -

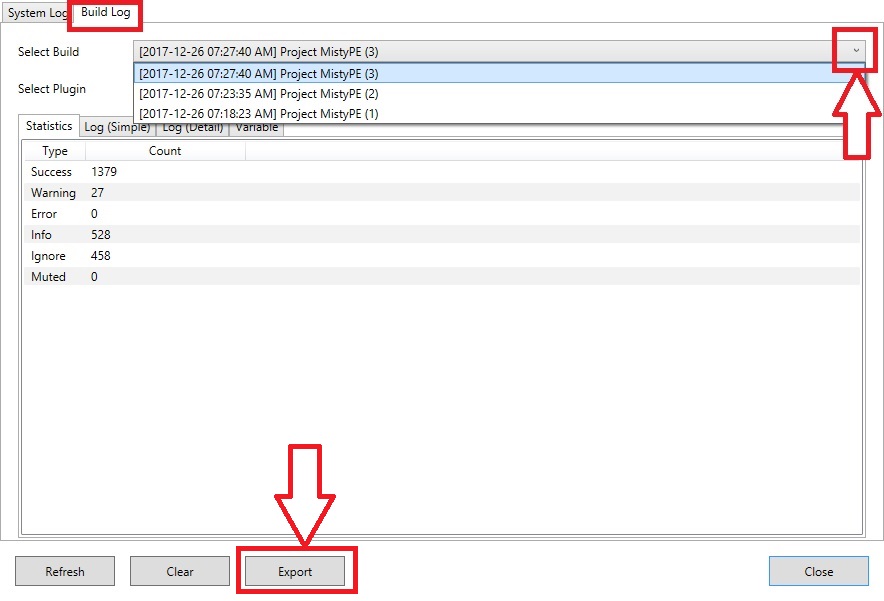
Use the tabs to toggle between System Log and Build Log pages (please note that the screenshot below is from the MistyPE project) -

In the Build Log tab, use the pick list in the Select Build field to select the required build log and then click on the Export button to save the log file (.html and plain .txt files are supported) -
Updating PEBakery
Pre-compiled PEBakery testbuild downloads are available here.
PEBakery version 0.9.2 beta1 (Build 20180103) is included in the project download. PEBakery is in active development and you may want to update to new versions as they are released. I recommend deleting all traces of the previous version before extracting a new test build to the directory containing the ADK project files. Assuming ADK is in the C:\ADK\ path, delete the following files/folders -
- C:\ADK\Launcher.exe (file)
- C:\ADK\Binary (folder)
- C:\ADK\Database (folder)
Now extract the files from the updated PEBakery testbuild download to the ADK root folder (the folder containing WinBuilder.exe and the Projects directory). Using the path from the example above, the project should now contain the following -
- C:\ADK\Launcher.exe (file)
- C:\ADK\Binary (folder)
- C:\ADK\Database (folder)
Document date - 18th January 2018