The examples in the instructions in ReadMe.txt (included in the SVBus download) focus on installing Windows to a blank disk. If a Windows Operating System is already installed then SVBus can be used to install a different version of Windows to a Virtual Hard Disk (VHD) - creating a multi-boot setup. This page covers installing Windows NT 5.* (Windows 2000/XP/2003) alongside an existing Windows NT 6.*/10.* setup.
Windows XP will be installed in the walkthrough below - the same process documented in this page can be adapted and used to install Windows 2000, XP and 2003 (32-bit and 64-bit) to a virtual disk using SVBus.
NOTE - the ThinkPad W530 test system with BIOS set to boot in CSM mode was used in this walkthrough.
The following table has been included as a reference to devices, files and paths that are used in the instructions in this page -
| GRUB4DOS Device + path |
Windows Mountpoint + path |
Notes |
|---|---|---|
| (hd0,0) | N/A | Boot partition - not allocated a drive letter in Windows |
| (hd0,1) | C:\ | Windows Operating System. |
| (hd0,2) | D:\ | Target partion for GRUB4DOS files and VHD file. |
| (hd0,2)/winnt5.vhd | D:\winnt5.vhd | Virtual Hard Disk (VHD) - this will be created in step 2 (see here). |
| (hd0,2)/grldr.mbr | D:\grldr.mbr | Refer to step 1 (see here). |
| (hd0,2)/grldr | D:\grldr | Refer to step 1 (see here). |
| (hd0,2)/menu.lst | D:\menu.lst | Refer to step 6 (see here). |
| (hd0,2)/xp.iso | D:\xp.iso | Refer to step 5 (see here). |
| (hd0,2)/svbus.ima | D:\svbus.ima | Refer to step 3 (see here). |
NOTE - if using different filenames/paths then please modify the instructions below, paying particular attention to menu.lst entries.
Boot Windows on (hd0,1) and complete the following steps to prepare the system ready for installing Windows NT 5.* to a virtual disk -
Boot GRUB4DOS and complete the following steps -
Add the GRUB4DOS files grldr and grldr.mbr to a local partition > use the command-line bcdedit.exe tool to add an entry to the system BCD store.
Alternatively, set up a GRUB4DOS bootable USB drive. This method has the advantage of not needing to modify any existing boot files, however the firmware must support booting from USB devices.
This process is covered in more detail here.
Diskpart usage is covered in more detail here.
Run the following diskpart commands (change size, filename and path according to your own requirements) -
NOTE - the virtual disk file must be contiguous. If the file is fragmented then it cannot be mapped using GRUB4DOS. [NOTE - GRUB4DOS version 0.4.6a is now reported to support mapping non-contiguous files]
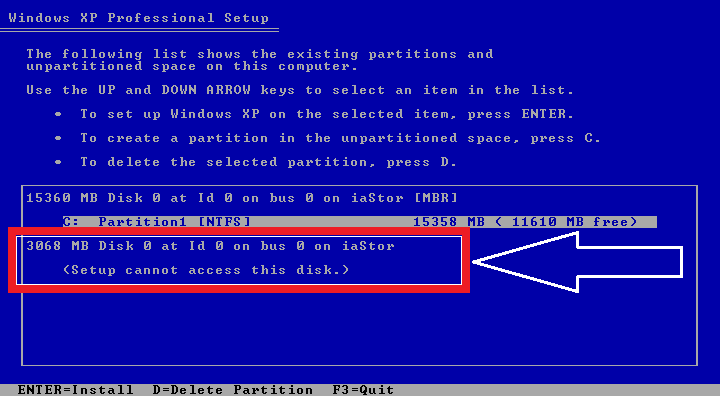
Please note that the virtual disk should be prepared using the steps above. Do not attempt to use a RAW disk image without any partition structure. When attempting to use a RAW disk image during tests it was not possible to access the mounted virtual disk during Windows XP setup. The following screenshot illustrates this issue - note the (Setup cannot access this disk.) message for the 3068 MB Disk -
Windows NT 5.* setup includes a prompt to Press F6 if you need to install a third party SCSI or RAID driver - this method is used to install the SVBus driver during setup. If the SVBus Driver is not installed at this stage then it will not be possible to access any devices mapped by GRUB4DOS.
Copy one of the following F6 boot floppy images to D:\svbus.ima - 1.44 MB Floppy Image or 2.88 MB Floppy Image (extract from the .zip file and rename as D:\svbus.ima).
Manually add the SVBus driver files to a floppy disk image if you do not want to use one of the pre-prepared images. ImDisk (see here) can be used to create and mount a floppy disk image.
NOTE - If the system Firmware is set to boot in SATA Advanced Host Controller Interface (AHCI) mode then you will also have to include SATA AHCI Drivers in the same disk image as the SVBus drivers. This is covered below.
NOTE - this step can be avoided if the firmware supports SATA compatibility mode - please use SATA compatibility mode for convenience if possible.
Windows NT 5.* does not include SATA Advanced Host Controller Interface (AHCI) drivers. If the system Firmware is set to boot in AHCI mode then you will also have to include SATA AHCI Drivers in the same disk image as the SVBus drivers in order to be able to access disks attached to your SATA controller. In addition to adding the driver files, the configuration file TXTSETUP.OEM will need to be edited to combine entries for your AHCI drivers and SVBus. Combining TXTSETUP.OEM files is covered in more detail here.
ImDisk (see here) can be used to mount the floppy disk image so that AHCI drivers can be added.
If AHCI mode is required, then another option is to set the firmware to Compatibility (IDE) mode when installing XP > complete the installation > download and install the AHCI driver for your controller post OS install > install the driver > ensure the AHCI service is set to run at next boot > reboot and change to AHCI in the BIOS.
Copy your Windows XP .iso file to the following path - D:\winxp.iso.
The GRUB4DOS loader grldr is configured to scan all devices/partitions with a supported filesystem for the configuration file \menu.lst
\menu.lst is a plain text file containing a series of GRUB4DOS commands, similar to a batch script. Commands in menu entries can be entered in the command-line, which is useful during testing or for troubleshooting as verbose feedback is issued following commands.
See here for more information about the configuration file \menu.lst, including potential issues with multiple configuration files on the same system.
Create a text file D:\menu.lst with the following contents. If using a USB device to boot GRUB4DOS, then create \menu.lst at the root of the drive.
NOTE - in the menu entries below root is set as the device containing the file \winnt5.vhd. In the Windows XP Setup Step 1 load ISO Image and Windows XP Setup Step 2 load ISO Image entries, the files \xp.iso and \svbus.ima are loaded from the same device (as \winnt5.vhd). Ensure that these three files are all located at the root of the same device, or adjust your menu entries.
Consider changing the Windows XP - RAMDISK menu entry to use high memory if the system has enough RAM. Use the map --top --mem command. The following information has been copied from the rmprepusb site - "...In grub4dos, the memory is divided into...3.25G high memory and low memory ends 3.25G mirroring can not cross this point. If your memory is less than 3.25G, you do not have the high-end memory available..." README_GRUB4DOS.TXT states "...map --top option to be used with --mem. map --mem will try to allocate memory at highest available address..."
Using high memory is recommended when booting 32-bit Operating Systems from a RAM Disk as 32-bit Windows can only access/address the first 3.25 GiB of RAM - this is approximate as available RAM may vary depending on BIOS limitiations and memory allocated to graphics.
Using the map --mem command and RAM Booting a 3 GiB VHD containing 32-bit Windows on the test system resulted in only 160 MiB of RAM available in the booted system, as the VHD file was mapped to the first 3 GiB of addressable space leaving only 160 MiB for the system -

Using high memory (map --top --mem) resulted in 3.15 GiB of available RAM as the disk image file was mapped to RAM above the first 3.25 GiB of addressable space -
Select GRUB4DOS menu option Windows XP Setup Step 1 load ISO Image. This will load/map the floppy disk image containing the SVBus (and optional AHCI) driver as a virtual Floppy device > load/map Windows .iso image as a virtual CD device > map Virtual Disk image as disk 0 > boot mapped .iso image and run Windows setup -

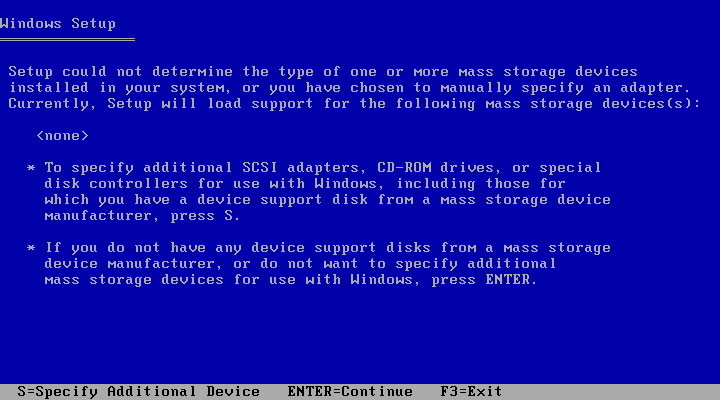
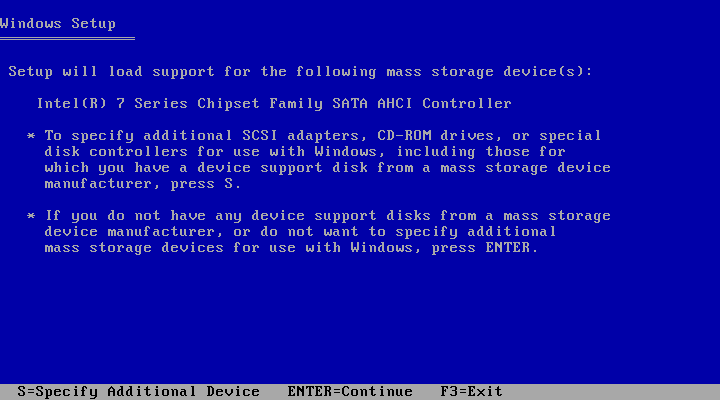
When prompted to Press F6 if you need to install a third party SCSI or RAID driver, press F6 to load the virtual floppy disk image containing SVBus -

The following screen shows the options for loading additional drivers, accessed by pressing F6 in the previous step. Press S to load SVBus and any other drivers required -
The screenshot below shows menu options for a customised F6 floppy with SVBus and SATA AHCI drivers -
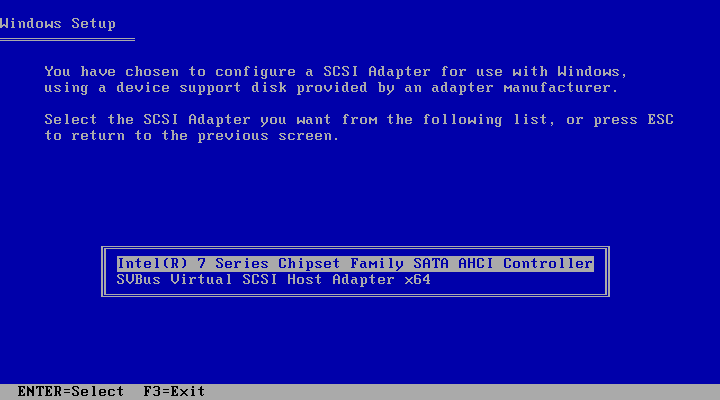
Screenshot with SATA AHCI driver already selected. Press the S key to load another driver -
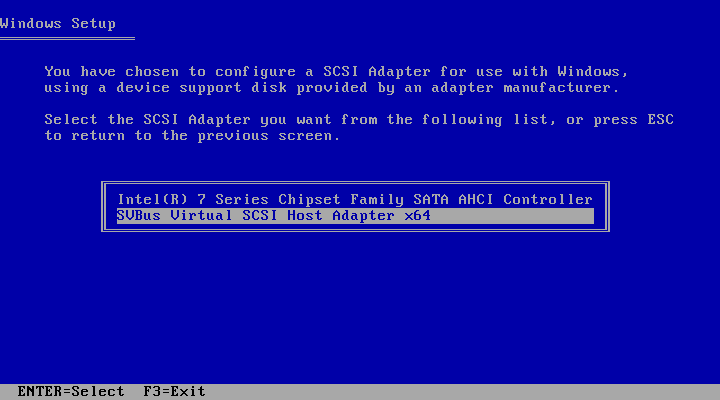
Select SVBus driver -
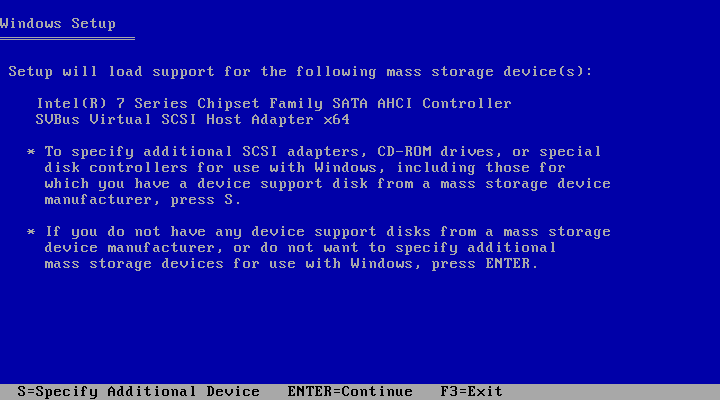
The screenshot below shows both the SATA AHCI and SVBus drivers selected. After selecting all drivers, press ENTER -
Welcome to Setup screen. Press ENTER to continue -

End User license Agreement Screen. Press F8 to continue -

Select Target partition. Identify using partition size. The Virtual Hard Disk created earlier is 3072 MiB in size and is easily identified in the screenshot below -

During tests it was not possible to access the mounted virtual disk unless it was prepared prior to running Windows 5.* setup. The following screenshot illustrates this issue -
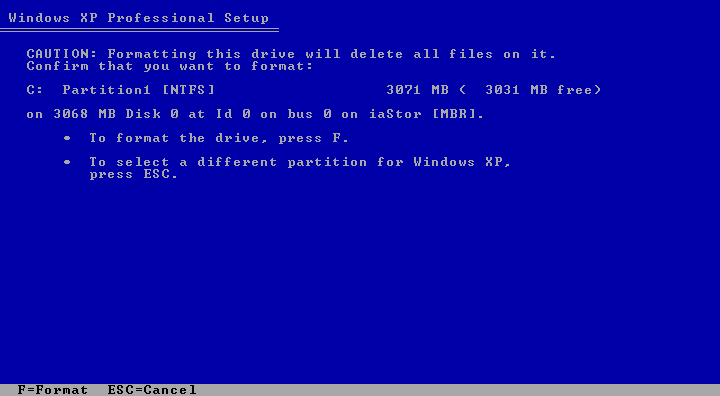
I recommend that you format the target partition using the Format the partition using the NTFS file system (Quick) option - this will ensure that NTLDR partition boot sector code is writen to the target partition.
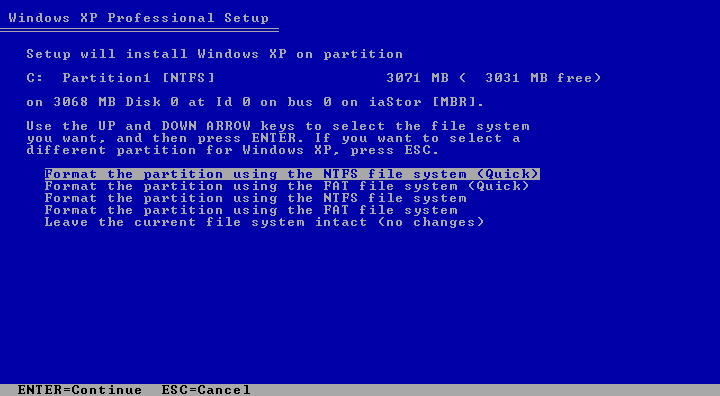
Press F to proceed with the format command -
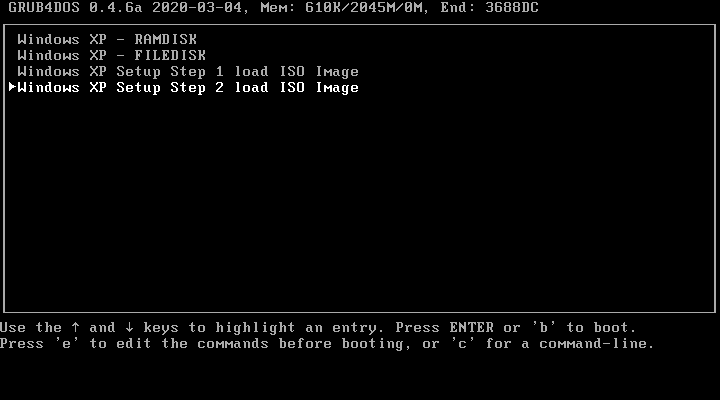
Select GRUB4DOS menu option Windows XP Setup Step 2 load ISO Image - load/map Windows .iso image as virtual CD > map Virtual Disk as disk 0 > boot mapped Virtual Disk and complete Windows setup -
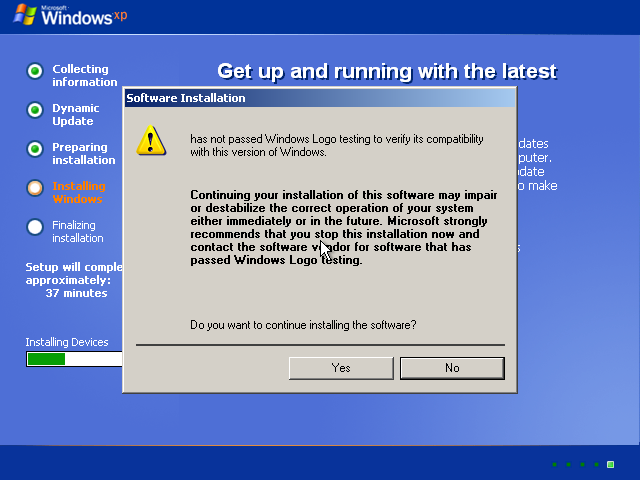
A warning screen will be displayed during setup. Click on YES to continue -
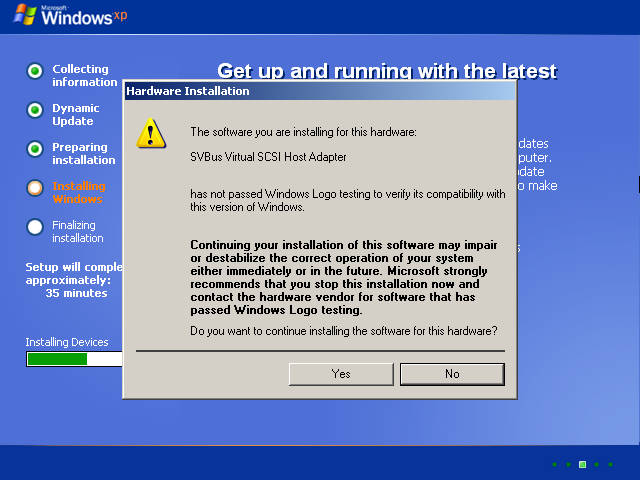
A second warning screen will be displayed during setup stating that SVBus Virtual SCSI Host Adapter has not passed Windows Logo testing...... Click on YES to continue -
Proceed with Windows NT 5.* setup.
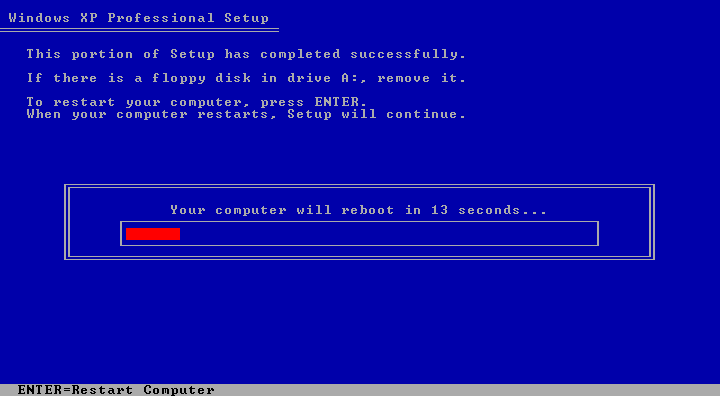
After completing setup the System will reboot. Following the reboot, select the menu option Windows XP - FILEDISK to boot the Virtual Hard Disk if you want to write any changes to the backing file, or Windows XP - RAMDISK to load and then boot the system from RAM.
Document date - 12th April 2023