NOTE - THIS PAGE FORMS PART OF THE INSTRUCTIONS FOR SETTING UP WINDOWS TO BOOT FROM A STORAGE AREA NETWORK (SAN) USING EITHER THE AoE OR iSCSI PROTOCOLS.
This page covers a file copy method to clone an existing Windows installation on the Client system to a disk image hosted on a Server - utilising wimlib.
Assuming that the source (the Client system) has already been configured for Network Booting, the instructions apply to iSCSI and/or AoE.
A range of methods can be used to clone Windows - including DD (which is covered on the etherboot wiki pages). Traditional cloning methods will produce an exact copy of the source - a sector by sector copy. This may well require significant storage space on the server - depending on the size of the source disk. Another disadvantage of traditional cloning methods is the risk of disk signature collision (see here) - no two disks (including disk images) can be mounted on the same Windows NT system if they share the same disk signature. Using file based backups and copying to a new VHD image will mitigate against disk signature collision.
Using file based backups and copying to a VHD can have the following advantages over traditional cloning methods -
NOTE - all of the steps in this section should be completed in WinPE - not the Client Operating System.
Page contents -
The following file paths are used in this section (amend as required for your own setup) -
Windows NT 5.*
If your Client Operating System files are on the same volume as its boot files, then no action needs to be taken. If the boot files are located elsewhere, then they will need to be copied to C:\ before the image is captured. Required files are ntldr, ntdetect.com and boot.ini
Windows NT 6.*
This step may not be required - it depends on whether the Client Operating System files are on the same volume as its boot files. From WinPE, check for the existence of a C:\boot\ directory (note - it may be hidden - run dir C: /AS from a command-line). If this directory exists then we will temporarily rename it - to C:\boot.backup\.
As we will be running the bcdboot command at a later stage the \boot\ directory is not required. Copying an existing \boot\ directory to the AoE or iSCSI Target will result in multiple menu entries after running bcdboot - this may result in booting the wrong system - the one on the Client system's internal disk.
The MountedDevices key stores drive letter allocations (mount points) for any existing volumes. If you want your iSCSI/AoE system to be mounted as volume C:\ when booted, then this key will need to be edited and any \DosDevices\C: Value will need to be either renamed or deleted to avoid conflicts when the AoE or iSCSI Target is booted.
Run the following command in WinPE -
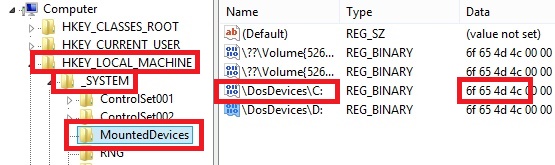
The following screenshot shows the entries in the MountedDevices key (this is the Client systems registry hive mounted Offline in WinPE - note the path HKLM\_SYSTEM\MountedDevices) -
The \DosDevices\C: entry in the panel on the right specifies the mount point for the Partition identified in its Data entry (the first four byte pairs (highlighted) are the hard disk signature, followed by offset (LBA)).
Delete any entries using the \DosDevices\#: format to force Windows to reallocate drive letters/mount points.
Alternatively, rename any entries using the \DosDevices\#: format to manually allocate mount points. Renaming \DosDevices\C: to \DosDevices\R: for example will change the mount point for this partition to R:\ when Windows is booted.
In the screenshot below you can see that \DosDevices\C: (disk 0, partition 2) has been renamed to \DosDevices\R: and \DosDevices\D: (disk 0, Partition 3) has been renamed to \DosDevices\S:...
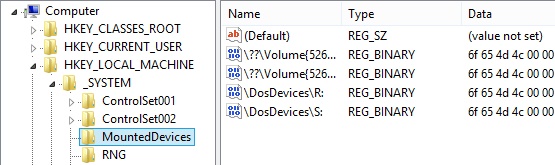
...when this system is copied to and booted from an AoE or iSCSI Target, the Client systems disk 0 partition 2 will be mounted as R: and disk 0 partition 3 will be mounted as S:. The AoE/iSCSI Target (a VHD containing one partition entry) will be mounted as C: as this drive letter is now available.
After editing the MountedDevices key, run the following command to unmount the registry hive -
NOTE - if you choose to rename these keys then we will need to change them back after capturing/copying Windows to a WIM archive to ensure that any hardcoded paths on the Client Operating System function if the Client is booted from the internal drive.
This step is optional. As we might be copying Windows to a VHD with less storage space than the original system, it is worth considering reducing the size of any pagefile.
This can easily be done from WinPE by editing the offline registry. See below for commands syntax -
These commands can be scripted. In the example below the pagefile is set to a fixed size of 1024 MB -
wimlib uses the following syntax when capturing files -
Where -
Run the following command to capture/copy C:\ as D:\Windows.Netwok.Boot.wim -
If you plan to boot the internal disk on the Client system then the following steps may need to be taken after capturing the Client Operating System -
Document date - 28th February 2017(DRAFT)