output from running the above command (note that one target (iqn.target)) is listed -

The instructions in this page have been tested using 32-bit lubuntu and 64-bit ubuntu (version 16.04 (Xenial Xerus)) - it may also be possible to install other versions and derivatives of ubuntu to an iSCSI Target using these instructions. Please note that the information in this page has been adapted from the following sources -
Page contents -
A live internet connection is required for this method - offline installations are not covered. Additional requirements include -
NOTE - Live USB media can be used as an alternative to setting up ubuntu/Lubuntu for PXE boot via a NFS share - if using Live USB media then a persistent install is recommended.
The following hardware and settings were used on the test system -
NOTE - the screenshots below are from ubuntu, the instructions cover both ubuntu and lubuntu.
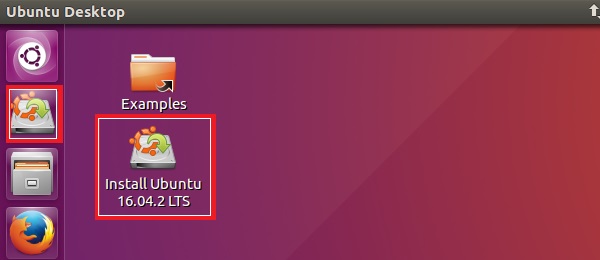
Start the Client System and boot ubuntu from the network share (or Live Media).
Start a terminal and enter the commands listed below (amending as required to reflect your own setup). On ubuntu, a terminal can be started by right-clicking on the desktop and selecting Open Terminal. On lubuntu, click on the menu button (bottom left) > System Tools > LXTerminal.
Log in with elevated privileges -
Download the package lists from the repositories to get information about any new versions and dependencies (recommended before installing any new software/packages) -
Install the open-iscsi software package (required to connect to the iSCSI Target before running the installer) -

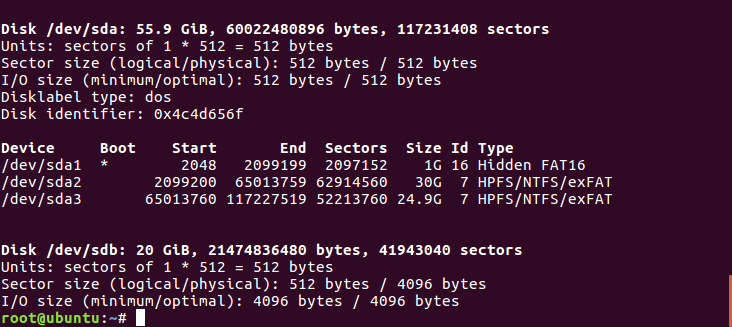
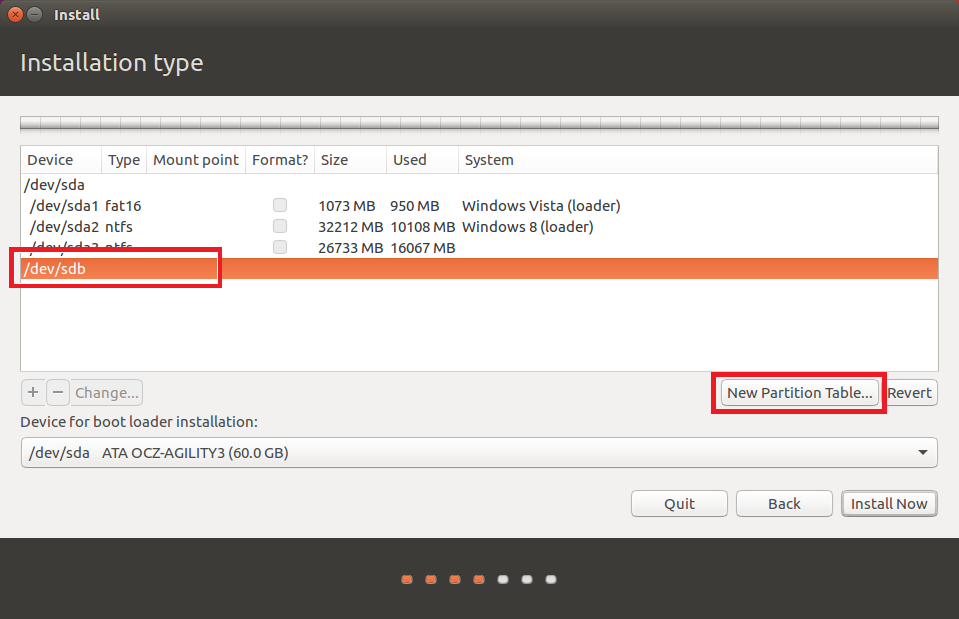
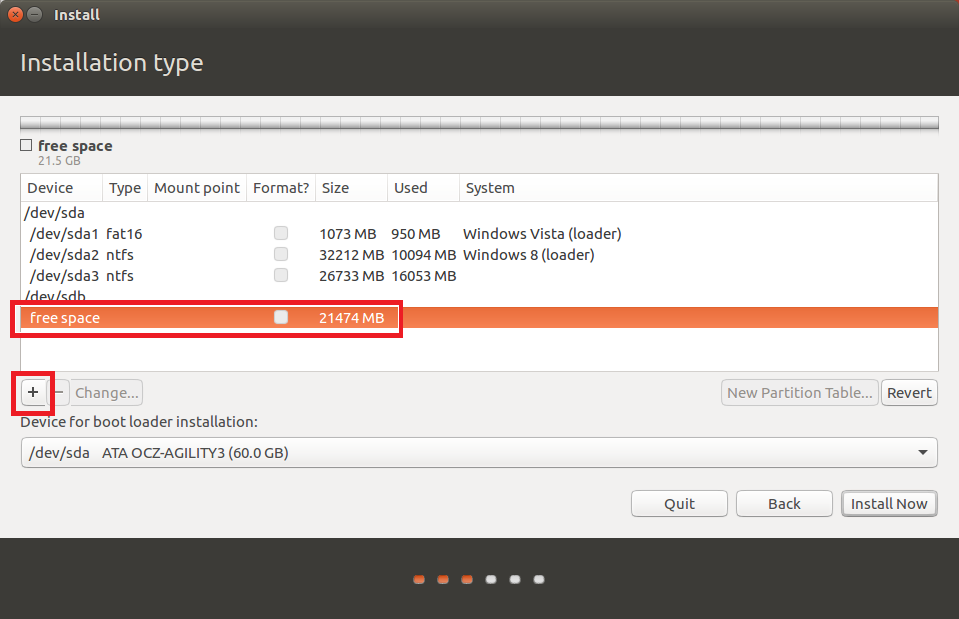
On the test system the iSCSI Target attached earlier was identified as /dev/sdb by checking the attributes of the devices listed when running the preceding command (fdisk -l).

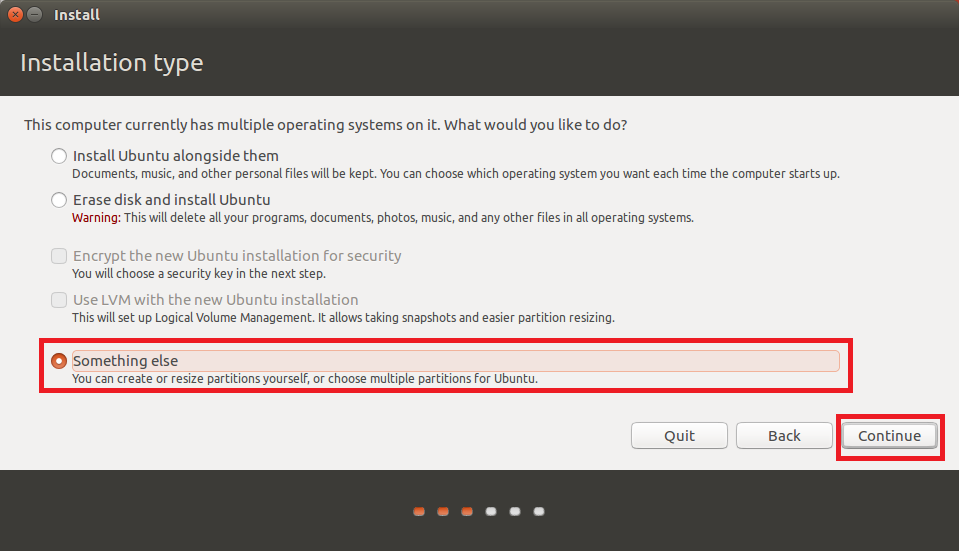
The majority of the installation screens/options are self explanatory. The following instructions focus on the steps required to prepare and select the iSCSI Target.

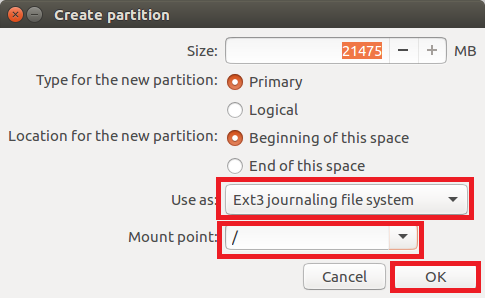
On the Create partition options screen, select the required file system (Ext3 used on the test system) > select Mount point: as / (root) > OK -


Complete the remaining screens as required and proceed with the installation.

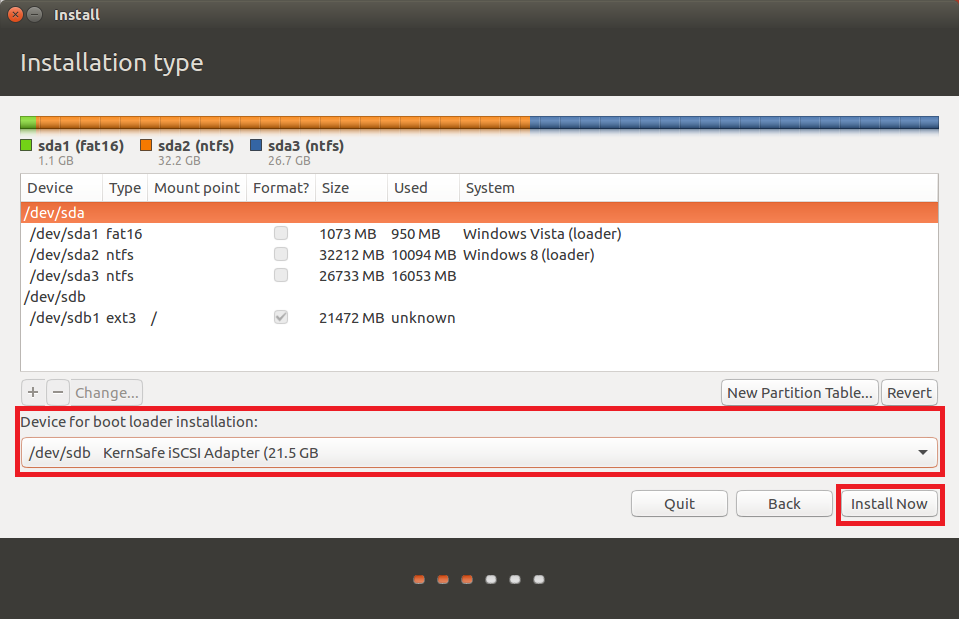
Remember that the iSCSI Target attached earlier was identified as /dev/sdb. The partition containing the operating system and boot loader files is device /dev/sdb1.
Create a directory to use as a mount point for the iSCSI Target partition (/dev/sdb1) -
Mount /dev/sdb1 to the directory created in the preceding step -
Change the root directory to the device mounted in the preceding step. After running this command, all additional commands will be executed on the new root device. This essentially allows changes to be made (including software installation) to the offline system -
Mount the /proc Filesystem -
Add the DNS IP address to /etc/resolv.conf. It was not possible to install any software on the test system without completing this step.
Create a hostname for the Client system -
Download the package lists from the repositories to get information about any new versions and dependencies (recommended before installing any new software/packages). Although this step was completed earlier, it needs to be repeated on the new root device (the offline system on the iSCSI Target) -
Install the initramfs-tools software package on the offline system -
Install the open-iscsi software package on the offline system -
Install the sysv-rc-conf software package on the offline system -
Add the line "iscsi" to /etc/initramfs-tools/modules -
Create file /etc/iscsi/initiatorname.iscsi and add the Client Initiator name (required by some software Targets to authenticate connections) -
Execute Touch command on file /etc/iscsi/iscsi.initramfs. The following information has been copied from here - "...The touch command is the easiest way to create new, empty files. It is also used to change the timestamps (i.e., dates and times of the most recent access and modification) on existing files and directories....A nice feature of touch is that, in contrast to some commands such as cp (which is used to copy files and directories) and mv (which is used to move or rename files and directories), it does not automatically overwrite (i.e., erase the contents of) existing files with the same name. Rather, it merely changes the last access times for such files to the current time..." -
Update/rebuild the initramfs file - the Initial RAM File System loaded by the kernel containing the device drivers and tools required to boot from the final root file system (incorporating the information required for connecting to the iSCSI Target during the boot process) -
Some commands will need to be added to the Grub configuration file (/boot/grub/grub.cfg) to successfully connect to the iSCSI Target during the boot process.
NOTE - do NOT edit any settings in this file unless you know what you are doing. Whilst it is necessary to make the additions detailed below, changing other settings may break the boot process!
Example grub.cfg (copied from the Client system before any edits were made) -
And the line that requires editing (in the menuentry 'Ubuntu' section) -
The following commands will need to be added -
Using the settings for the test system -
Due to security permissions, the easiet way to edit the grub.cfg file is to run the following command -
After editing the file, press [Ctrl]+[O] to write the changes to the file, and [Ctrl]+[X] to exit the text editor.
Edited line in grub.cfg -
The /etc/network/interfaces file will need to be edited to stop the operating system from reconfiguring any settings on the Ethernet interface. Set device eth0 to manual - eth0 is the first ethernet interface on the system.
The following information will need to be added to /etc/network/interfaces -
Run the following command to open /etc/network/interfaces for editing -
If you have multiple network interfaces on the Client system, then consider adding additional settings. E.g. -
NOTE - you can ignore this section if using iPXE or chainloading iPXE from a different Network Boot Program.
Identify the relevant kernel and initrd files from the menuentry 'Ubuntu' section in the modified /boot/grub/grub.cfg (refer to stage 4).
Using the test system as an example, the linux and initrd lines in the menuentry 'Ubuntu' section are as follows -
The kernel file can consequently be identified as /boot/vmlinuz-4.4.0-64-generic, and the initrd file as /boot/initrd.img-4.4.0-64-generic.
Copy the kernel and initrd files to your Tiny PXE Server root directory. E.g. -
Assuming all of the steps above have been completed, shutdown ubuntu/lubuntu and add the required settings for your Network Bootstrap Program...
...then boot the Client system.
Remember to ensure that the required files are copied to your Tiny PXE Server root directory -
You will also need to ensure that the kernel and initrd were copied in Stage 6 (the file names may vary in different builds/versions) -
linux and initrd lines copied from the menuentry 'Ubuntu' section in the modified /boot/grub/grub.cfg (refer to stage 4).....
.....Converted to the grub4dos menu format -
Amend file names as required and add the menu entry to C:\pxesrv\files\menu.lst\default.
If using this method iPXE can be used to SANBOOT the iSCSI Target - kernel and initrd files do not need copying to the Server.
Add the following to C:\pxesrv\files\menu.lst\default (create this file if required) -
Contents of C:\pxesrv\files\ubuntu.iscsi.txt (create this file if required) -
Refer to the iSCSI URI Syntax section for information about iSCSI Target device names.
Remember to ensure that the required files are copied to your Tiny PXE Server root directory -
You will also need to ensure that the kernel and initrd were copied in Stage 6 (the file names may vary in different builds/versions) -
linux and initrd lines copied from the menuentry 'Ubuntu' section in the modified /boot/grub/grub.cfg (refer to stage 4).....
.....Converted to the pxelinux menu format -
Amend file names as required and add the menu entry to C:\pxesrv\files\pxelinux.cfg\default.
If using this method iPXE can be used to SANBOOT the iSCSI Target - kernel and initrd files do not need copying to the Server.
Add the following to C:\pxesrv\files\pxelinux.cfg\default (create this file if required) -
Contents of C:\pxesrv\files\ubuntu.iscsi.txt (create this file if required) -
Refer to the iSCSI URI Syntax section for information about iSCSI Target device names.
Remember to ensure that the required files are copied to your Tiny PXE Server root directory -
Add the following to the menu section of C:\pxesrv\files\ipxe_menu.txt -
Add the following to the menu options section of C:\pxesrv\files\ipxe_menu.txt -
E.g. -
NOTE - remember to change any references to ${dhcp-server} to ${next-server} if using ProxyDHCP.
Click on one of the following for config.ini settings (edit to reflect your own setup) -
iPXE menus are essentially scripts. It's also possible to specify a simple script to boot the iSCSI Target using the altfilename option in config.ini. For example, create a script in the TFTP root directory C:\pxesrv\files\ubuntu.iscsi.txt > add altfilename=ubuntu.iscsi.txt to config.ini. NOTE - remember to change any references to ${dhcp-server} to ${next-server} if using ProxyDHCP.
Sample iPXE script ubuntu.iscsi.txt -
The format for iSCSI URI's is - iscsi:[servername]:[protocol]:[port]:[LUN]:[targetname]
Where -
If default settings are used for the protocol, port and LUN fields then these fields can be left blank. The following entries for example will all function (assuming the Target IP address is 192.168.1.1 and that this IP address is correctly set as the dhcp-server variable when iPXE is booted) -
Document date - 28th February 2017(DRAFT)