
PXELINUX version 4.06 (2012-10-23) is included in the Tiny PXE Download. The most recent PXELINUX release at the time of writing is 6.03, however an older version has been included in the download as newer versions have issues when chainloading other Network Bootstrap Programs.
PXELINUX can be downloaded from https://www.kernel.org/.../syslinux/. If replacing the PXELINUX files included in the download then please note that as of PXELINUX version 5.00, file dependencies were introduced for the Network Bootstrap Program (pxelinux.0) and c32 modules. Previous versions (including PXELINUX version 4.06 in the download) do not have any file dependencies - the pxelinux.0 loader and c32 modules are all standalone files. The table below lists file dependencies for these files if version 5.00 (or newer) are used (information is from here) -
Please note that gpxelinux.0, a hybrid bootloader containing gPXE/iPXE, has been deprecated and replaced with lpxelinux.0 since PXELINUX version 5.10.
Since version 6.00 .c32 files are platform specific and the PXELINUX download now includes separate directories for BIOS (\bios), 32-bit UEFI (\efi32) and 64-bit UEFI (\efi64) binary files. The menu.c32 module for example has three separate binary files in the following locations -
Dependencies can be found in the following paths (where * is either bios, efi32 or efi64) -
The default path for the PXELINUX configuration file is the \pxelinux.cfg\ directory - the path is relative to the PXELINUX Network Bootstrap Program - pxelinux.0. It's possible to use separate configuration files for each client PC by using a filename based upon information unique to each client. Configuration file names are parsed in the following order -
On a test system with the following setup...
PXELINUX can be configured to display a menu when the Network Bootstrap Program pxelinux.0 is loaded. The SysLinux website lists a comprehensive range of options that can be used for a basic menu system. The Tiny PXE Server package includes a COM32 module for displaying a text based menu - menu.c32. It's possible to replace this with vesamenu.c32 if you want to add support for graphics - i.e. a splash screen.
A quick note on the graphics mode supported in vesamenu.32 - the default is a resolution of 640x480 pixels. It's possible to change this using the MENU RESOLUTION command (e.g. "MENU RESOLUTION 1024 768") - if the selected resolution is not supported then a text mode menu will be displayed. Image files in .PNG, .JPG and LSS16 formats are supported.
Although the focus here is on using menu.c32, the syntax for vesamenu.c32 is almost identical. Notepad.exe can be used to create a menu configuration file - all entries are text based. A basic menu using menu.c32 (note that all paths are relative to the directory containing pxelinux.0 - in the example below menu.c32 is located in the same directory as pxelinux.0) -
DEFAULT menu.c32
MENU TITLE PXELinux Boot Options
A vesamenu alternative (note the addition of the MENU BACKGROUND line with a path to a .jpg file) -
DEFAULT vesamenu.c32
MENU BACKGROUND /pxelinux.cfg/splash.jpg
MENU TITLE PXELinux Boot Options
The PXELINUX menu entries in this guide have been kempt as simple as possible. The majority of options here use the format -
LABEL ipxe
MENU LABEL iPXE
KERNEL ipxe.lkrn
or
LABEL ipxe_menu
MENU LABEL iPXE (Load menu.ipxe)
KERNEL ipxe.lkrn
APPEND initrd=menu.ipxe
It's also possible to load submenus -
LABEL submenu1
MENU LABEL Floppy Disk Image Submenu
KERNEL menu.c32
APPEND pxelinux.cfg/submenu1.txt
Putting all this together -
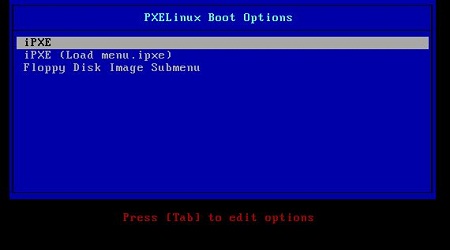
Screenshot of the above menu as displayed on the client system -

Now let's take a closer look at the menu entry syntax -
The previous section lists some basic menu options - for more comprehensive range of settings refer to http://www.syslinux.org/.../menu.c32 and http://www.syslinux.org/.../SYSLINUX.
Hotkeys -
In the following example the hotkey i is assigned to this entry -
LABEL ipxe
MENU LABEL ^iPXE
KERNEL ipxe.lkrn
TIMEOUT - used to boot the first (or default) menu entry after the time period specified (in 1/10's of a second - e.g. TIMOUT 100 is equal to 10 seconds) -
MENU DEFAULT -
TEXT HELP -
MENU BEGIN - create a submenu within the menu file. This command must be followed by a tag (e.g. MENU BEGIN floppies) -
Check the following sample menu for examples of the additional commands listed above -
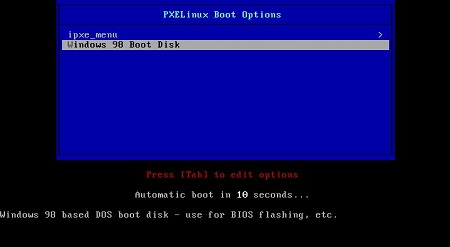
Screenshot of the above sample menu when loaded on the client system -

iPXE supports HTTP and SANBOOT - consequently there are times when it might be useful to chainload ipxe.lkrn from PXELINUX. The following menu entry shows the syntax for loading ipxe.lkrn (kernel) with a script (initrd) -
If chainloading ipxe.lkrn the iPXE scripts used in this guide may need to be edited to add commands for configuring the Client PCs network interface. This is not required when using iPXE as the network bootstrap program with a script set as altfilename in config.ini as the network interface is automatically configured. To configure the first network adapter, simply add the following code at the start of any scripts to run the dhcp command -
E.g. -
Document date - 28th February 2017(DRAFT)