wimboot version 2.5.2 was used in the tests carried out below and is included in the Tiny PXE Server version 1.0.0.20 (dated 12/2/2017 (19:29)) download package. The most recent wimboot version can be downloaded from here. The wimboot and wimboot_architecture pages on the iPXE site contain detailed information about usage.
All references to wimboot in this page refer to the wimboot module developed by Michael Brown - this is not to be confused with the wimboot feature introduced in Windows 8.1 (a method used to boot a full Windows OS from files within a compressed .wim image on a local drive).
wimboot features -
Windows Preinstallation Environment (WinPE) and file dependencies required for PXE booting WinPE are covered in detail in the WinPE page of this document - please read the WinPE page first, prior to this page.
Sections in this page include -
The wimboot page lists several commands that can be passed to wimboot (e.g. using the iPXE kernel command) -
As a minimum, the following files are required for booting WinPE via wimboot -
The following paths (relative to the HTTP root directory) are used in the instructions below -
NOTE - on 32-bit UEFI systems, references to the UEFI boot file bootx64.efi will need to be replaced with \bootia32.efi.
The required WinPE files are (down)loaded using either the imgfetch, initrd or module commands. These files are mapped to a Virtual Filesystem using a Virtual Name - refer to the wimboot Virtual Filesystem and Paths section for more information about the Virtual Filesystem. The Virtual Name can be the same as the original filename, or a different name can be used - a Virtual Name must however be specified. There are limited scenarios in which a filename will need to be mapped using a different Virtual Name - this concept is covered in more detail in the Using alternative .wim or BCD files section of this page.
A typical example for loading a file on Clients with BIOS Firmware uses the following syntax -
The syntax for Clients with UEFI Firmware is slightly different, either one of the examples below can be used -
Where on both BIOS and UEFI systems -
Putting these elements together, on Client systems with BIOS Firmware the relevant line in the iPXE script could use one of the following to map the file BOOTMGR.EXE using the virtual name bootmgr.exe -
Putting these elements together, on Client systems with UEFI Firmware the relevant line in the iPXE script could use one of the following to map the file BOOTX64.EFI using the virtual name bootx64.efi -
NOTE - Filenames and Virtual Names are not case sensitive - UPPERCASE and lowercase names have been used for bootmgr.exe and bootx64.efi in the examples above to illustrate how wimboot uses Virtual Names.
wimboot maps any files (down)loaded using either the imgfetch, initrd or module commands to a Virtual Filesystem. Any file loaded by wimboot will be mapped to multiple locations on this wimboot Virtual Filesystem. At the time of writing these locations include -
Taking the command initrd http://192.168.1.1/BOOTMGR.EXE bootmgr.exe from the earlier example, the actual file BOOTMGR.EXE will be mapped as the virtual file bootmgr.exe in ALL of the following (virtual) paths -
Breaking down the commands listed in the sample script above -
Breaking down the commands listed in the sample script above -
It is possible to use the same script on BIOS and UEFI systems by specifying the Virtual Name using the --name (or -n) switch before the PATH, and also after the PATH. Use the syntax -
In the above example, the || operator (following the 3rd and 4th lines) is specified to proceed to the next line if the command fails (e.g. if bootmgr.exe or bootx64.efi is missing).
On UEFI systems, bootmgr.exe will be loaded to the Virtual Filesystem, but will be ignored and bootx64.efi will be loaded and booted.
On BIOS systems, bootx64.efi will be loaded to the Virtual Filesystem, but will be ignored and bootmgr.exe will be loaded and booted.
See here for a sample script configured to load the correct boot file based on platform firmware.
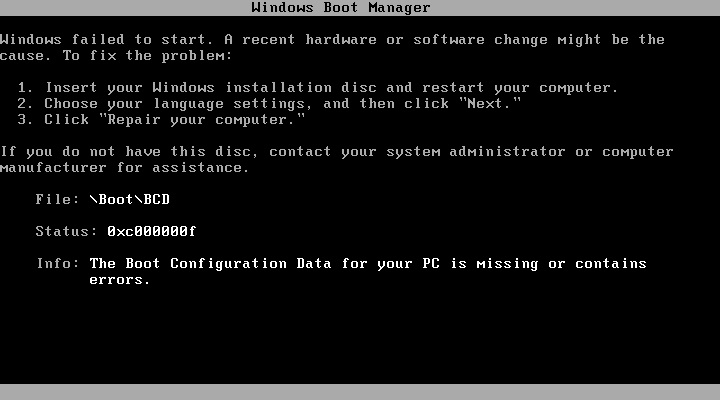
The most likely problems, assuming that all of the required files were loaded successfully, are incorrect filename(s)/path(s) in either the Virtual Filestem and/or the BCD (Boot Configuration Data) store.
Fix - map the BCD store using the Virtual Name BCD. The following example demonstrates how to map the BCD store http://192.168.1.1/BCD2 using the Virtual Name BCD -
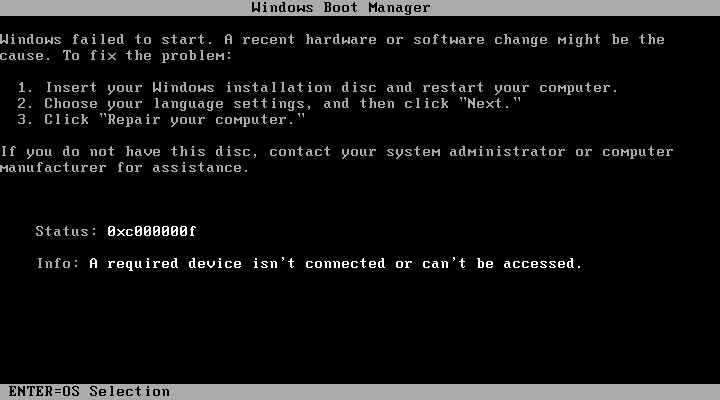
This error could be the result of a required file (*.sdi or *.wim - or both) not being found if the hardcoded path in the BCD store does not match one of the paths on the wimboot Virtual Filesystem (see here). Taking a *.wim file as an example, assuming the Filename for the *.wim file is boot.wim, the path to this file in your BCD store MUST be one of the following -
To check the path(s) in your BCD store (e.g. C:\pxesrv\files\boot\BCD), use the following bcdedit command -
Output from running the above command on the BCD store available here -
And the relevant section for the *.wim file (note the path is specified in the device and osdevice lines as \boot\boot.wim) -
The Virtual Names for all required files must also match the Filename specified in the BCD store. If the BCD store specifies the *.wim file with path as \sources\boot.wim then your *.wim file must be loaded with the Virtual Name boot.wim. If the BCD store specifies the *.wim file with path as sources\x86.wim then your *.wim file must be loaded with the Virtual Name x86.wim.
Fix - map the *.wim file using the Virtual Name boot.wim and map the *.sdi file using the Virtual Name boot.sdi and use the BCD store available here. The script used to create this BCD store is available here. The paths match paths on the wimboot Virtual Filesystem and should work on BIOS and UEFI Client systems (edit IP_ADDRESS and any PATHS to reflect your own setup).
Remember that any files specified in the initrd lines of wimboot scripts must specify a virtual name. Whilst the Virtual Name can be identical to the actual Filename, it can be different.
This allows multiple versions of .wim and .sdi files to be booted without having to create different BCD stores (or adding multiple entries to one BCD store). The following script helps to demonstrate this (note that the BCD store (here) with contents...
...and entries for boot.wim and boot.sdi is used in the test below.
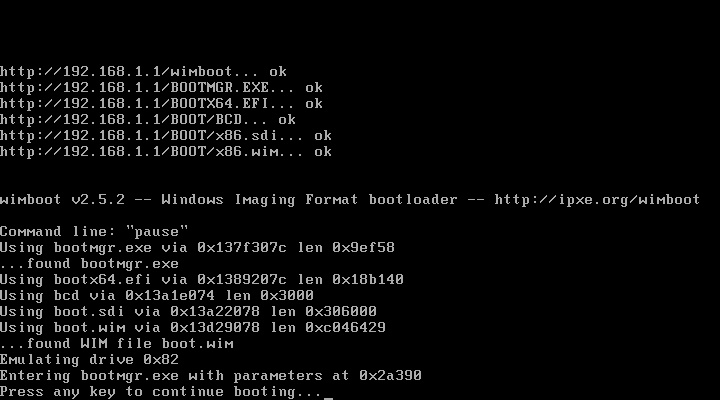
We can see from the above screenshot that x86.wim (http://192.168.1.1/BOOT/x86.wim) was loaded successfully - after control was passed to wimboot the file was found as boot.wim (wimboot output - "...found WIM file boot.wim").
The same method can be used to load different BCD stores - e.g.
The wimboot documentation states -
I'm not sure how accurate this statement is, as on the text system there were significant benefits in terms of RAM usage when using the native Windows PE network bootstrap program (pxeboot.n12 - see here) instead of wimboot.
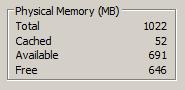
The screenshot below shows total memory available on the test system (VMWare Player with 1GB of RAM) when WinPE was loaded using pxeboot.n12 (Total RAM = 1022 MB) -
The screenshot below shows total memory available on the test system (the same VMWare Player system with 1GB of RAM) when WinPE was loaded using wimboot (Total RAM = 818 MB) -
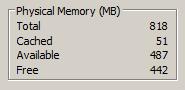
The difference in Total RAM between the two systems is 204 MB - with the wimboot system having less RAM available. The difference in RAM is approximately the size of the boot.wim file containing WinPE - this is similar to RAM usage with memdisk - whilst it may no longer be possible to access the emulated disk (the wim mapped to memory) from the booted operating system if the kernel runs in protected mode, the RAM it occupies will remain in use - it's no longer available to the operating system.
It is not possible to successfully boot WinPE via wimboot from PXELINUX version 4.06 - iPXE must be chainloaded and then used to boot wimboot.
In addition to the WinPE files listed in the Required Files section, ensure that the following files are copied to your Tiny PXE Server root directory -
Add the following to C:\pxesrv\files\pxelinux.cfg\default (create this file if required) -
Contents of C:\pxesrv\files\wimboot_lkrn.txt (create this file if required) -
NOTE - remember to change set boot-url http://${dhcp-server} if using ProxyDHCP. Also note that as we are chainloading iPXE we need to run the dhcp command to configure the network interface before running the other commands.
Some newer (than PXELINUX 4.06) versions of PXELINUX can run wimboot directly without chainloading iPXE - see
here and here. The following menu entry was tested using PXELINUX version 6.03 -
Note that the linux.c32 module is required.
PXELINUX version 6.03 also supports mapping files with different filenames (refer to the Using alternative .wim or BCD files section). Syntax is initrdfile=PATH_FILE@MAP_AS - to map boot\x86.wim as boot.wim, use initrdfile=boot\x86.wim@boot.wim. E.g. -
Click on one of the following for sample config.ini settings (edit to reflect your own setup) -
It is not possible to successfully boot WinPE via wimboot from grub4dos using the version included in the Tiny PXE Server download - iPXE must be chainloaded and then used to boot wimboot.
In addition to the WinPE files listed in the Required Files section, ensure that the following files are copied to your Tiny PXE Server root directory -
Add the following to C:\pxesrv\files\menu.lst\default (create this file if required) -
Contents of C:\pxesrv\files\wimboot_lkrn.txt (create this file if required) -
NOTE - remember to change set boot-url http://${dhcp-server} if using ProxyDHCP. Also note that as we are chainloading iPXE we need to run the dhcp command to configure the network interface before running the other commands.
Some newer versions of Grub4dos are reported to run wimboot directly without chainloading iPXE - see
here. This feature was added in Grub4dos version 0.4.5c-2014-11-10, however I have not had any success in my tests. Reported menu syntax -
Click on one of the following for config.ini settings (edit to reflect your own setup) -
Remember to ensure that the required files are copied to your Tiny PXE Server root directory -
Add the following to the menu section of C:\pxesrv\files\ipxe_menu.txt (create this file if required) -
Add the following to the menu options section of C:\pxesrv\files\ipxe_menu.txt -
E.g. -
NOTE - remember to change set boot-url http://${dhcp-server} if using ProxyDHCP.
Click on one of the following for config.ini settings (edit to reflect your own setup) -
As an alternative to a menu, use a script to automatically load wimboot. Specify the script using the altfilename option in config.ini. NOTE - remember to change set boot-url http://${dhcp-server} if using ProxyDHCP.
Sample iPXE script -
Sample iPXE script configured to load the correct boot file based on platform firmware -
Document date - 28th February 2017(DRAFT)