Secure Boot is part of the UEFI specification and is a hardware requirement for Windows systems, required since the release of Windows 8. Secure Boot created a method to ensure that boot loaders are digitally signed, introducing security measures to reduce the risk of unsigned files installing malicious code (e.g. root kits).
Microsoft act as a Certification Authority (CA) for Secure Boot and effectively controls the authorisation and issuing of digital signatures for Secure Boot, with third parties able to apply for certification. Unfortunately there are numerous restrictions and exclusions for certification, including a ban on files with a GPLv3 or similar licence 1.
Secure Boot uses Public-Key infrastructure to authenticate files in the Secure boot chain. This essential relies on the use of public and private cryptographic key pairs. The majority of systems will have a microsoft key imbedded in the firmware, enabling authentification of Microsoft signed files. Many third party boot loaders are not signed with a Microsoft key and would be unlikely to pass Secure Boot certification, this includes GRUB4EFI (aka GRUB4DOS_for_UEFI). If running third party boot loaders then I would recommend turning off Secure Boot in the firmware settings. In situations where Secure Boot cannot be disabled, it may be possible to boot unsigned .efi files including GRUB4EFI using the files and methods documented in this page to bypass Secure Boot.
The methods and tools used in this guide are the work of ValdikSS, based on their Super UEFIinSecureBoot Disk (see also here).
This guide uses files from the Super UEFIinSecureBoot Disk, with the following files extracted from Super-UEFIinSecureBoot-Disk_minimal_v3-4.zip (7-zip can be used to extract the files - alternatively the core files have been extracted here for convenience).
| \EFI\BOOT\BOOTX64.EFI | Stage 1 64-bit boot loader. Currently based on Red Hat shim (v15-8) from Fedora. This file is signed with a Microsoft key and is used for the initial boot stage > chainloading \EFI\BOOT\grubx64.efi
"...Stage 1: motherboard loads shim. Shim is a special loader which just loads next executable, grubx64.efi (preloader) in our case. Shim is signed with Microsoft key, which allows it to be launched in Secure Boot mode on all stock PC motherboards. Shim contains embedded Fedora certificate (because it's extracted from Fedora repository). If Secure Boot is enabled, since grubx64.efi is not signed with embedded Fedora certificate, shim boots another executable, MokManager.efi, which is a special shim key management software. MokManager asks user to proceed with key or hash enrolling process. Newer versions of shim install hooks for UEFI LoadImage, StartImage, ExitBootServices and Exit functions to "Harden against non-participating bootloaders", which should be bypassed for this disk use-case. Fedora's shim does not install custom UEFI security policies, that's why it's not possible to load self-signed efi files from second stage bootloader, even if you add their hashes or certificates using MokManager....." 2 |
| \EFI\BOOT\grubx64.efi | Stage 2 64-bit loader. Modified Linux Foundation PreLoader. This is used to circumvent UEFI Security Policy to chainload unsigned .efi files. This stage 2 loader (chainloaded by \EFI\BOOT\bootx64.efi) will chainload the stage 3 loader \EFI\BOOT\grubx64_real.efi
"...Stage 2: preloader is a software similar to shim. It also performs executable validation and loads next efi file. Preloader included in this disk is a stripped down version which performs only one function: install allow-all UEFI security policy. This permits loading of arbitrary efi executables with LoadImage/StartImage UEFI functions even outside GRUB (for example, in UEFI Shell), and bypasses shim hardening...." 2 |
| \EFI\BOOT\mmx64.efi | 64-bit MOK (Machine Owner Key) manager. This program will automatically be loaded by the stage 1 loader if the firmware does not have an entry for the stage 2 loader enrolled in the UEFI Secure Boot key database. This process is only required once. If the key is enrolled successfully then the stage 2 loader will automatically load. |
| \EFI\BOOT\bootia32.efi | Stage 1 32-bit boot loader. Refer to more detailed information in the \EFI\BOOT\bootx64.efi section above.
\EFI\BOOT\bootia32.efi > \EFI\BOOT\grubia32.efi |
| \EFI\BOOT\grubia32.efi | Stage 2 32-bit boot loader. Refer to more detailed information in the \EFI\BOOT\grubx64.efi section above.
\EFI\BOOT\bootia32.efi > \EFI\BOOT\grubia32.efi > \EFI\BOOT\grubia32_real.efi |
| \EFI\BOOT\mmia32.efi | 32-bit MOK (Machine Owner Key) manager. Refer to more detailed information in the \EFI\BOOT\mmx64.efi section above. |
| \ENROLL_THIS_KEY_IN_MOKMANAGER.cer | Digital certificate for \EFI\BOOT\grubx64.efi\\EFI\BOOT\grubia32.efi. As these files do not contain an embedded Fedora certificate (required for the stage 1 loader to automatically load stage 2) MOK manager will be loaded and can be used to install this digital certificate, allowing the stage 2 loader to load successfully on subsequent boots. |
The Super UEFIinSecureBoot Disk is a three stage boot loader. The following files are loaded on 64-bit systems -
| stage 1. \EFI\BOOT\bootx64.efi |
> | stage 2. \EFI\BOOT\grubx64.efi |
> | stage 3. \EFI\BOOT\grubx64_real.efi |
The following files are loaded on systems with 32-bit firmware -
| stage 1. \EFI\BOOT\bootia32.efi |
> | stage 2. \EFI\BOOT\grubia32.efi |
> | stage 3. \EFI\BOOT\grubia32_real.efi |
The stage 1 and stage 2 files are extracted from the Super UEFIinSecureBoot Disk. As the stage 2 loader can be used to chainload unsigned files, any 64-bit boot loader can be saved as \EFI\BOOT\grubx64_real.efi or 32-bit boot loader saved as \EFI\BOOT\grubis32_real.efi. This includes the following -
| rEFInd |
"...rEFInd is a fork of the rEFIt boot manager. Like rEFIt, rEFInd can auto-detect your installed EFI boot loaders....rEFInd goes beyond rEFIt in that rEFInd better handles systems with many boot loaders, gives better control over the boot loader search process, and provides the ability for users to define their own boot loader entries..." 3
Download links 64-bit - Extract refind_x64.efi and rename as grubx64_real.efi (path \EFI\BOOT\grubx64_real.efi) 32-bit - Extract refind_ia32.efi and rename as grubx64_real.efi (path \EFI\BOOT\grubia32_real.efi) |
| GRUB4DOS_for_UEFI | Download links
64-bit - Extract bootx64.efi and rename as grubx64_real.efi (path \EFI\BOOT\grubx64_real.efi) 32-bit - Extract bootia32.efi and rename as grubx64_real.efi (path \EFI\BOOT\grubia32_real.efi) |
One of the advantages of UEFI over BIOS is the built in support for file systems. This makes it relatively easy to create a bootable USB drive to launch a third party boot manager. The UEFI specification "...mandates support for the FAT12, FAT16, and FAT32 file systems (see UEFI specification version 2.9, section 13.3. 1.1), but any conformant vendor can optionally add support for additional file systems; for example, the firmware in Apple Macs supports the HFS+ file system..." 4. To ensure compatabiliy on as wide a range of systems as possible, FAT32 is recommended.
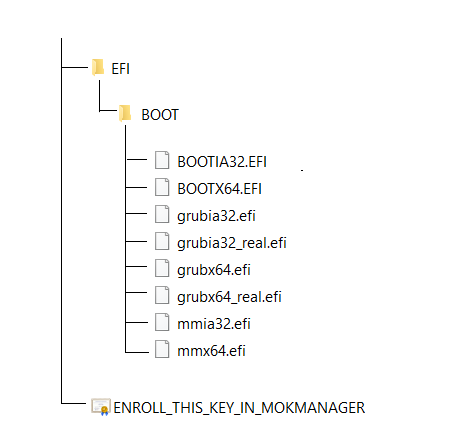
Due to the filesystem support, file based copying can be used to create a bootable drive - boot code does not need to be edited and active flags do not need to be set. To create a basic UEFI bootable drive, format as FAT32 and create the following directory structure (with paths relative to the volume root, directories in red and files in blue) -
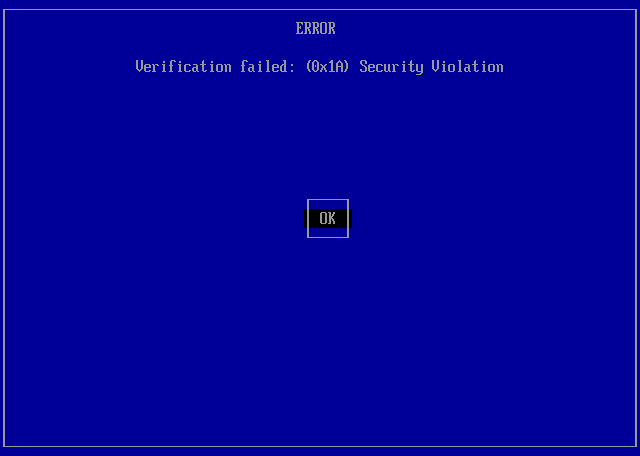
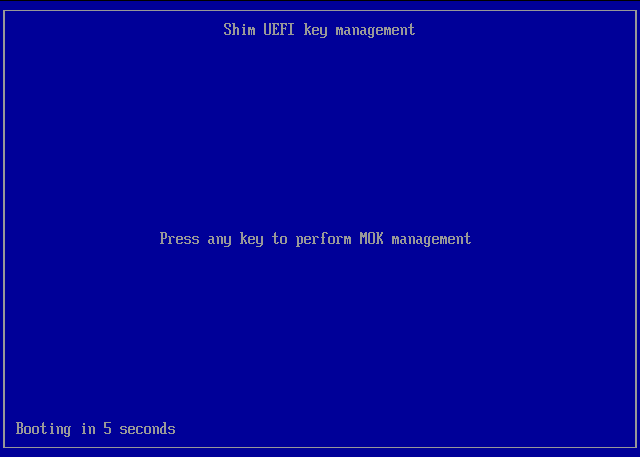
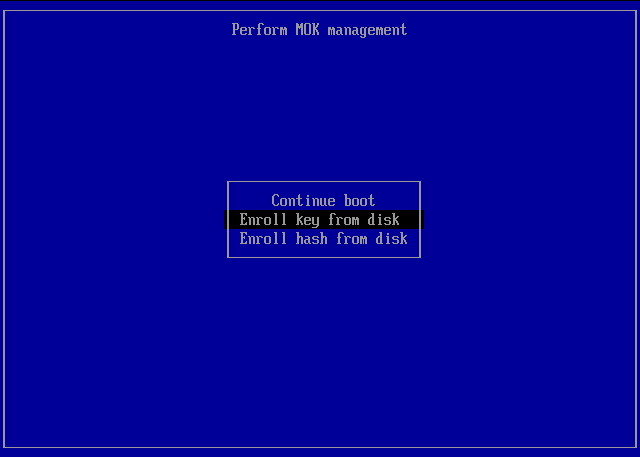
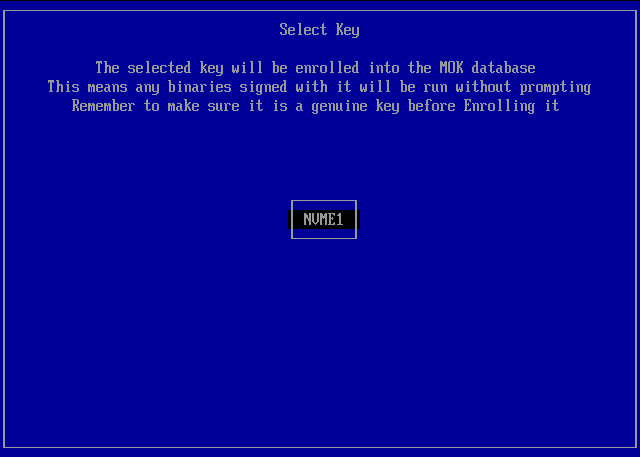
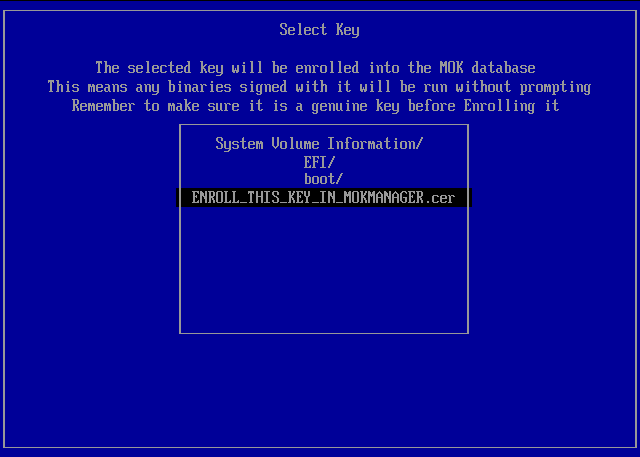
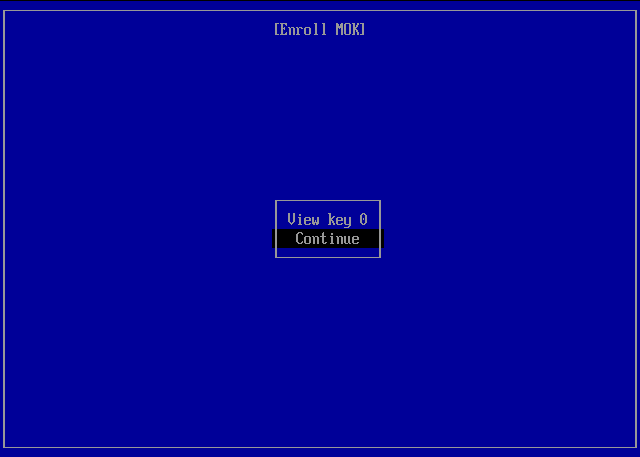
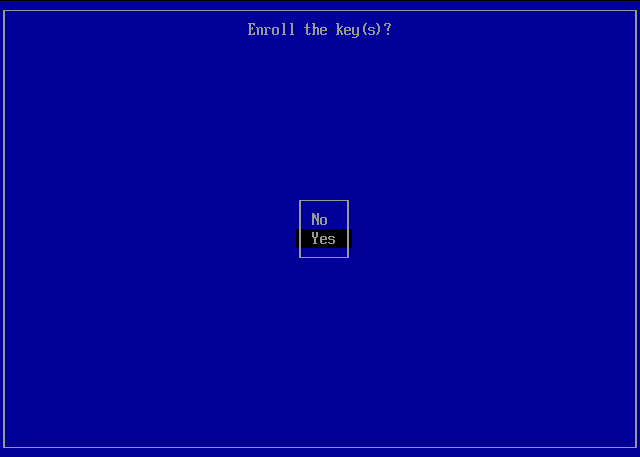
The following screenshots show the process for installing the digital certificate (\ENROLL_THIS_KEY_IN_MOKMANAGER.cer) for the stage 2 loader (\EFI\BOOT\grubx64.efi)
ERROR > the Verification Failed message is displayed when the stage 2 loader does not have a digital certificate enrolled in the UEFI Secure Boot key database. Seleck OK > Enter -
Shim UEFI key management > Press any key within the 10 second time limit to progress with MOK management and enrolling the digital certificate
Perform MOK management > Select the option Enroll key from disk > Enter -
Select Key > Select the disk/volume containing your digital certificate/key file. In the screenshot below only one volume was available - this was the EFI system partition with volume label NVME1 -
Select Key > Browse to ENROLL_THIS_KEY_IN_MOKMANAGER.cer > ENTER -
Enroll MOK > Select Continue -
Enroll the key(s)? > Select Yes -
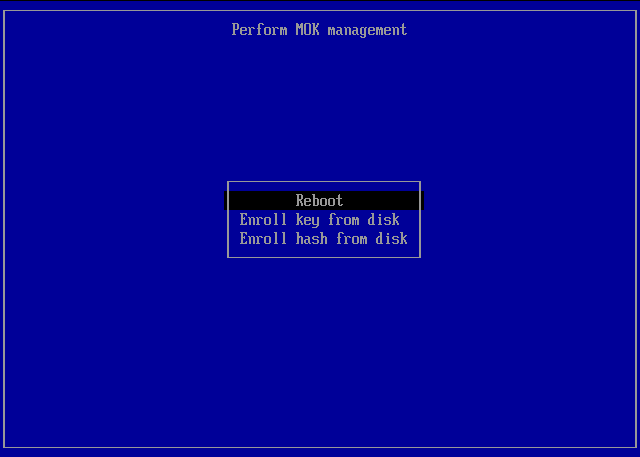
Perform MOK management > Select Reboot -
2 https://github.com/ValdikSS/Super-UEFIinSecureBoot-Disk
3 https://sourceforge.net/projects/refind/
4 https://wiki.archlinux.org/title/EFI_system_partition
Document date - 18th March 2023