This section covers booting Windows from a SAN (Storage Area Network) using the AoE protocol (ATA over Ethernet). Please note that it may not be possible to network boot all versions of Windows using the methods in this page. For more information about the AoE Protocol, refer to the wiki (here).
This page is intended as an overview of the steps required to successfully network boot a Windows Operating System - Windows XP, 7 (Service Pack 1) and Server 2008 R2 (Service Pack 1) are all confirmed to be working using the method detailed below.
A quick note on terminology.
I am not aware of any methods of installing Windows directly to an AoE Target - to set up a Target you will need to modify an existing Windows installation on the Client system, then clone/copy the Windows installation to the Target.
UEFI NOTE - I have not been able to test AoE Boot on UEFI Client systems as I do not have the relevant hardware. These instructions are for Client systems with BIOS firmware, however they should work on UEFI Client systems with CSM enabled.
Whilst you may want to turn off your Firewall during initial setup/testing to rule out Firewall issues in the event of any errors, the AoE Protocol itself runs at Layer 2 and should function with a Firewall enabled. On a test system an AoE Target booted successfully with Firewalls enabled on Server and Client systems - without any Firewall exceptions for vBlade having been configured. Layer 2 connections are running below the TCP/IP Layer - effectively bypassing the software Firewall.
Client Configuration -
Server Configuration -
Client Configuration -
Server Configuration -
This subject is covered in more detail on a separate page. Select one of the following -
This subject is covered in more detail on a separate page - see here
This subject is covered in more detail on a separate page - see here
NOTE - not required for Windows NT 5.* Systems.
This subject is covered in more detail on a separate page - see here.
This subject is covered in more detail on a separate page - see here
Whilst it may be possible to apply the WIM file captured in the preceding step(s) from the Client system to an AoE Target, I personally recommend copying the WIM file to the server. Applying a WIM to network attached storage can be frustratingly slow and it can also be difficult to mount the AoE Target on the Client (I have not been successful in running the AoE Initiator in WinPE, and have found it buggy in Windows as it often fails to detect Targets).
Your WIM file can be copied over the network to a share on the Server (recommended if you have a fast network), or transferred via USB storage. For the purpose of this guide the WIM file/path on the Server will be C:\pxesrv\Windows.Network.Boot.wim
NOTE - the server must be running a Windows 7 (or newer) Operating System, as VHD support is not natively supported in earlier versions of Windows. WinPE 3.0+ can be used as an alternative if required (Windows Automated Installation Kit (Windows AIK) or Windows Assessment and Deployment Kit (Windows ADK)).
On Windows NT 6.1+ systems a VHD (Virtual Hard Disk) file can be created using the command-line DiskPart tool. The commands are listed below and can be executed individually, or the process can be scripted -
Line 1 (create vdisk file="c:\pxesrv\AoE.vhd" maximum=20480 type=fixed) -
Line 2 (attach vdisk file="c:\pxesrv\AoE.vhd")
Line 3 (create part pri)
Line 4 (format fs=ntfs label=AoE quick)
Line 5 (active)
Line 6 (assign letter=Q)
Let's assume that the instructions in this guide have been followed and the same files/paths have been used -
Download\copy the wimlib executable and dependencies to the following path -
Run the following command -
Check path(s) in Q:\boot.ini and edit as required. As an example, Windows XP was cloned from partition 2 on my Client and had the following content in Q:\boot.ini -
Partition 2 does not exist in the VHD Target - the paths will therefore need editing so that Windows is located correctly. E.g. to -
The command-line bcdboot tool can be used to create boot files for Windows NT 6.* systems.
Run the following command -
Important note for 64-bit systems - A new BCD store with default settings will have been created when running the bcdboot command. In order to load the AoE drivers during the boot process we will need to enable Testsigning again. To Enable testsigning in the BCD store bcdedit -
After copying Windows from the Client system to the VHD mounted on the server (the Target) and editing boot files, the VHD will need to be unmounted before mounting in vBlade. Use DiskPart with the following commands -
Note - if the VHD needs to be remounted in Windows, then run the first command listed above and replace the second command (detach vdisk) with attach vdisk
This subject is covered in more detail on a separate page - see here.
Remember to ensure that the required files are copied to your Tiny PXE Server root directory -
Add the following to the menu section of C:\pxesrv\files\ipxe_menu.txt -
Add the following to the menu options section of C:\pxesrv\files\ipxe_menu.txt -
E.g. -
NOTE - remember to change any references to ${dhcp-server} to ${next-server} if using ProxyDHCP.
Click on one of the following for config.ini settings (edit to reflect your own setup) -
iPXE menus are essentially scripts. It's also possible to specify a script for booting from an AoE Target by using the altfilename option in config.ini. For example, create a script in the TFTP root directory C:\pxesrv\files\aoe.ipxe > add altfilename=aoe.ipxe to config.ini.
Sample iPXE script (edit as required if the target is not set as Shelf 0 Slot 0) -
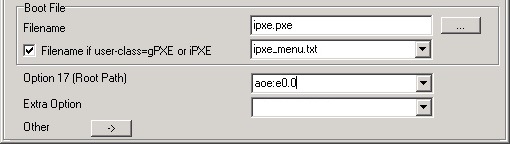
As an alternative to using a script, set the AoE Target in the Option 17 (Root Path) field. Settings required for opt17 in config.ini
And/or in the Tiny PXE Server GUI -
Document date - 28th February 2017(DRAFT)