
This section covers booting Windows from a SAN (Storage Area Network) using the iSCSI protocol (Internet Small Computer Systems Interface).
Unlike the AoE Protocol, it is possible to install Windows NT 6.* (including Windows 7, 2008, 8 and 8.1) directly to an iSCSI Target without the need to clone or copy an existing system. Installing to an iSCSI Target is covered here.
This page covers cloning an existing Windows NT 6.* system - it is very similar to the process covered in the AoE section of this guide. The following sections are covered in this page -
A quick note on terminology.
UEFI NOTE - I have not been able to test iSCSI Boot on UEFI Client systems as I do not have the relevant hardware. These instructions are for Client systems with BIOS firmware, however they should work on UEFI Client systems with CSM enabled.
Prior to cloning/copying Windows to an iSCSI Target the existing Windows Operation System will need to be configured. The steps involved are covered below -
During initial setup/testing I recommend that the firewall on the server and client be turned off - the firewall settings can then be configured once your iSCSI Windows Network Boot is confirmed to be working. This will greatly assist in troubleshooting.
On Windows NT 6.* systems the following command can be used to turn off the Windows firewall -
Before cloning Windows the iSCSI Target software will need to be installed and configured (see here).
You will need the unique identifier (the IQN) of your iSCSI Target - E.g. iqn.iSCSI-target1.
WinPE is required to start the installation process. In the example below a WinPE .ISO will be booted from the Server using memdisk (path to the WinPE ISO is \iso\WinPE.iso). wimboot can be used as an alternative to memdisk (see here for a sample script), as can chain-loading pxeboot.0 (see here for a sample script).
Sample iPXE script for stage 1 (DHCP)
Sample iPXE script for stage 1 (Proxy DHCP)
Breaking down the entries in the script above -
The commands in the script above can be added to an existing iPXE menu, or saved as a file (e.g. iscsi1.ipxe) and executed by loading the file during the PXE boot process using altfilename in Tiny PXE Server's configuration file (config.ini) or the GUI. This is covered in more detail in the iPXE settings section below (see here)
After configuring the iSCSI Target there are two distinct stages involved in cloning Windows NT6.* to an iSCSI Target -
NOTE - as previously mentioned in the iSCSI (Windows Targets) page of this guide, some Targets will only allow authenticated connections - Client/Host system identifiers may need to be specified for connections to be made. pyTarget for example will only allow connections from a Client/Host whose IQN has been added to a filter list. Microsoft iSCSI Software Target 3.3 also requires Client/Host identification.
A simple workaround is to add an iPXE command to set the Client IQN prior to the SANHOOK or SANBOOT command being issued. E.g. add Host name iqn.client to any filter list, and add the following iPXE command to the iPXE script/menu/command-line -
E.g.
PXE boot the Client system.
The following screenshot shows the output from running the script in the Server Configuration section -
Run diskpart to prepare the iSCSI Target for setup. Run the List Disk command to show available hard disks. On the screenshot below the iSCSI Target was not accessible - the reason for this was due to the custom WinPE not having initialized the network....
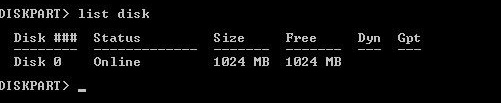
...after running the wpeutil InitializeNetwork command (in a command-prompt) and re-running List Disk in DiskPart, the iSCSI Target was visible -

Having identified the iSCSI Target by it's size as Disk 1, run the command sel disk 1 to give the disk focus.

NOTE - it's important to ensure that the correct disk is selected as otherwise you may end up carrying out subsequent commands on the wrong disk!
Double check it is the correct disk by running the detail disk command -

After ensuring that the correct disk was selected, create a primary type partition spanning the whole disk by running the create part pri

Mark\set the partition as active by running the active command -

Finally (quick) format the disk using NTFS with volume label SANBOOT by running the command format fs=ntfs label=SANBOOT quick -

Assign a drive letter/mount point by running the assign command -
Exit diskpart and, remaining in WinPE, follow the instructions in the Stage 1 (Apply WIM to Target) section.
NOTE - refer also to the Stage 1 (Copy Windows - STRARC) section for an alternative cloning method.
Using this method has the advantage of creating a backup file of the Client Operating System that can be used to restore the Client or create another iSCSI Target at a later date.
Configure the offline Client Windows Operating System and capture to a WIM file following the instructions here - capturing Windows to D:\Windows.Netwok.Boot.wim.
Let's assume that the instructions in this guide have been followed and the same files/paths have been used -
Run the following command -
NOTE - refer also to the Stage 1 (Copy Windows - wimlib) section for an alternative cloning method.
Using this method has the advantage of copying directly from the Client to the Target, whilst preserving any junction or reparse points that might be present.
Please refer to the Copy Windows (STRARC) page for detailed instructions.
Remaining in WinPE - the command-line bcdboot tool can be used to create boot files for Windows NT 6.* systems.
Run the following command...
Sample iPXE script for stage 2 (Proxy DHCP)
Breaking down the entries in the script above -
Configure Tiny PXE Server to run stage 2 script and PXE Boot the Client system.

The format for iSCSI URI's is - iscsi:[servername]:[protocol]:[port]:[LUN]:[targetname]
Where -
If default settings are used for the protocol, port and LUN fields then these fields can be left blank. The following entries for example will all function (assuming the Target IP address is 192.168.1.1 and that this IP address is correctly set as the dhcp-server variable when iPXE is booted) -
Remember to ensure that the required files are copied to your Tiny PXE Server root directory -
Set iscsi-target environment variable in C:\pxesrv\files\ipxe_menu.txt (create this file if required) -
Add the following to the menu section of C:\pxesrv\files\ipxe_menu.txt -
Add the following to the menu options section of C:\pxesrv\files\ipxe_menu.txt -
E.g. -
NOTE - remember to change any references to ${dhcp-server} to ${next-server} if using ProxyDHCP.
Click on one of the following for config.ini settings (edit to reflect your own setup) -
iPXE menus are essentially scripts. It's also possible to specify individual scripts for each stage of the iSCSI installation process by using the altfilename option in config.ini. For example, create a script in the TFTP root directory C:\pxesrv\files\iscsi1.ipxe > add altfilename=iscsi1.ipxe to config.ini. NOTE - remember to change any references to ${dhcp-server} to ${next-server} if using ProxyDHCP.
Stage 1 - Sample iPXE script for Stage 1 -
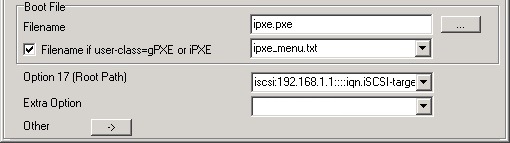
Stage 2 - Either enter a path to a script as in the instructions above, or set the iSCSI Target in Option 17 (Root Path). Settings required for opt17 in config.ini
And/or in the Tiny PXE Server GUI -
Document date - 28th February 2017(DRAFT)